Make a Call
Using this application, there are multiple ways calls can be placed. You can make a call by dialing an extension number or phone number, pressing Call for an entry in the Contacts or History pages, and using a Quick Dial.
Dial a Phone Number
- Touch the Keypad
 tab.
tab. - Dial the extension or phone number.
Quick Tip: To avoid any issues dialing, it is recommended to include the country code of any telephone numbers dialed. For example, use +1 when calling someone from North America.
- Tap the Call
 icon to initiate the call.
Use the Contacts Directory
- Touch the Contacts
 tab.
tab. - Search for the contact's name.
- Tap the Call icon.
Call an Entry in Your Call History
- Touch the History
 tab.
tab. - Locate the call history entry by the caller's name or phone number.
- Tap the Call icon on the call history entry to initiate the call.
Use a Quick Dial
- Touch the Quickdial
 tab.
tab. - Tap the added quick dial to initiate the call.
After the conversation is complete, tap the End Call  button to dismiss the call.
Receive Calls
When your app is being called, it should show a notification regarding the incoming call.
If your app does not have the Fullscreen incoming calls setting enabled, a banner notification of the call will display with the options to Answer or Dismiss the call:
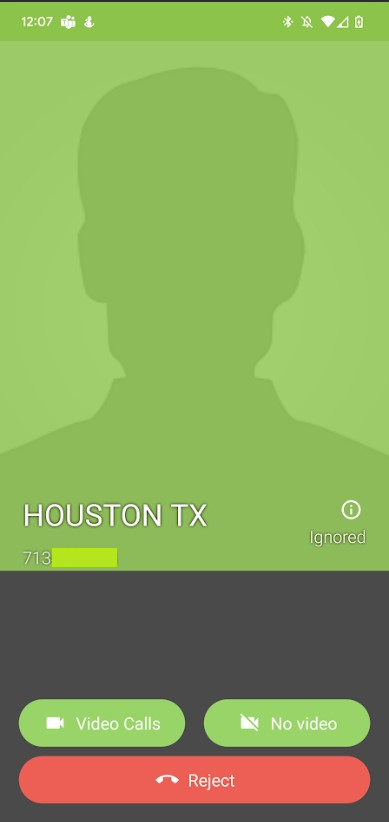
If you do have the Fullscreen incoming calls setting enabled, the incoming call will appear as a full screen notification with the options to answer the call as a Video Call, answer the call with No Video, Ignore the call or Reject the call.
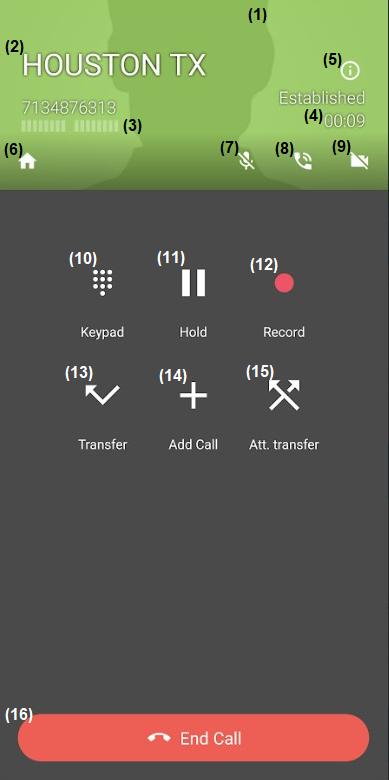
Active Call Features
While you are speaking with someone on a call, you can put the caller on hold, record calls, transfer calls (attended and unattended transfers), merge calls, and open a dual-tone multi-frequency (DTMF) keypad.
| Item | Description |
|---|---|
| (1) | Displays the call participant's photo, if available. |
| (2) | View the contact name and phone number of the call participant. |
| (3) | Shows the input level of the call participant's microphone. |
| (4) | The duration of your current call. |
| (5) | Tap the Information  icon to examine metric of the call's quality. icon to examine metric of the call's quality. |
| (6) | Touch the Home  icon to open the main application screen. icon to open the main application screen. |
| (7) | You can mute or unmute the microphone by tapping the Mute  icon. icon. |
| (8) | You can turn speakerphone on or off by tapping the Speakerphone |
| (9) | Use the Camera  button to turn the camera of your mobile device off and on. button to turn the camera of your mobile device off and on. |
| (10) | Touch the Keypad  button to pull up the dual-tone multi-frequency (DTMF) keypad. button to pull up the dual-tone multi-frequency (DTMF) keypad. |
| (11) | Use this button to hold or resume a call. |
| (12) | Tap this button to start and stop recording the call. |
| (13) | Initiate a cold (aka unattended or blind) transfer. |
| (14) | Add new call participant(s) to the present call for conferencing. |
| (15) | Initiate a warm (aka attended) transfer. |
| (16) | Touch End Call to dismiss the call. |
To access other tabs on a call, tap the Home icon (6) to leave the active call screen and open the application screen.
Mute or Unmute Yourself
Touch the Mute ![]() icon to mute the microphone. Touch this icon again to unmute.
icon to mute the microphone. Touch this icon again to unmute.
Turn Speakerphone On or Off
Tap the Speakerphone ![]() icon to turn on the speakerphone. Touch this icon again to turn the speakerphone off.
icon to turn on the speakerphone. Touch this icon again to turn the speakerphone off.
Make a Blind or Unattended Transfer
On the call screen, touch the transfer  button to initiate an unattended transfer. Unattended transfer, also known as a cold or blind transfer, is when you transfer a call to another destination without establishing a conversation with this new call recipient. The first call is put on hold until the call is transferred successfully.
To make an unattended transfer:
- On an active call, touch the transfer button.
✔ The Keypad screen will display while the first call is placed on hold.
Quick Tip: To cancel the transfer, tap Cancel Transfer at the top of the screen.
- Use the Keypad to dial the other party's extension or telephone number.
Make a Warm or Attended Transfer
On the call screen, touch the att.transfer  button to initiate an attended transfer. Attended transfer, also known as a warm transfer, is when you transfer a call to another destination but want to speak with this new call recipient before the transfer. The first call is put on hold until the call is transferred successfully.
To make an attended transfer:
- On an active call, touch the att. transfer button.
✔ The Keypad screen will display while the first call is placed on hold.
Quick Tip: To cancel the transfer, tap Cancel Transfer at the top of the screen.
- Use the Keypad to dial the other party's extension or telephone number.
- Speak with the new call recipient when the new call is answered.
- Touch the Transfer button to completely transfer the call.
Quick Tip: To cancel the unattended call operation, select the Cancel button.
Record Calls
WARNING: Some countries and states impose laws and regulations on recording calls.
We recommend requesting consent from call participants before recording any call. Please consult with the regulatory experts in your company before using this feature.
To start recording an active call, tap the record  button on the call screen. Touch this icon again to stop the recording.
View and Manage Recordings
Once the calls are recorded, the users can retrieve them in the History  tab.
tab.
To access a call recording:
- Touch the History tab.
- Touch the Information
 icon beside the name or phone number you want to retrieve the recording.
Quick Tip: The Recording
 icon shows that the call log has recording(s).
 - Touch the Play Record
 button to listen to the recording.
 - Touch the Pause
 button to pause the recording.
 - To manage the recording, touch the Options
 icon on that recording entry.
A list of recording settings will display:- Delete - Deletes the recording.
- Share - Sends the recording to someone else using other applications.
- Prevent auto-delete - Keeps the recording from being deleted by the auto-delete duration setting.
Lock Recordings
When an auto-delete recording duration is set, the recordings are deleted once expired. However, by enabling Prevent auto-delete, the user can lock some important ones to exclude them from being deleted.
To lock the recording from being deleted:
- Touch the History tab.
- Tap the Information
 icon beside the name or phone number whose call has been recorded.
 - On that recording entry, touch Options
 → Prevent auto-delete.
✔ A lock will display on the entry to indicate it is excluded from being deleted.
Quick Tip: To unlock the recording, tap Options
→ Enable auto-delete.
Place a Call on Hold
Users can put a call on hold to pause the conversation so that none of the user and call participant(s) can hear each other.
To put a call on hold, touch the Hold  button on the call screen. Touch this button again to resume the call.
Conference Calls
The users can add more people to an active call to form a conference call.
Establish a Conference Call
Touch the Add call  button to add more people to an active call in the form of a conference call.
To form a conference call:
- On the call screen, select the Add call button.
Quick Tip: Tap Back To Call to cancel adding a new participant.
- Use the Keypad to dial the other party's extension or telephone number.
✔ The first call will be placed on hold while the second party is dialed.
- Touch the Join
 button when the second recipient answers the call.
 - To add more people, repeat steps 1 to 3.
- To dismiss a conference call, touch the End Call button.
Split a Conference Call
In a conference call, the user can split the conference to separate calls by tapping the Split  button. Consider using this feature when some call recipients want to leave the conference or have a private conversation with the caller.
To split a conference call:
- On an active conference call, select the Split button.
- Touch the Switch
 button and pick the participant to remove from the conference.
Quick Tip: To form a conference call from the separate calls again, tap the Join
button on the call screen.
Use the DTMF Keypad
Tap the Keypad button on the call screen to open the DTMF keypad. 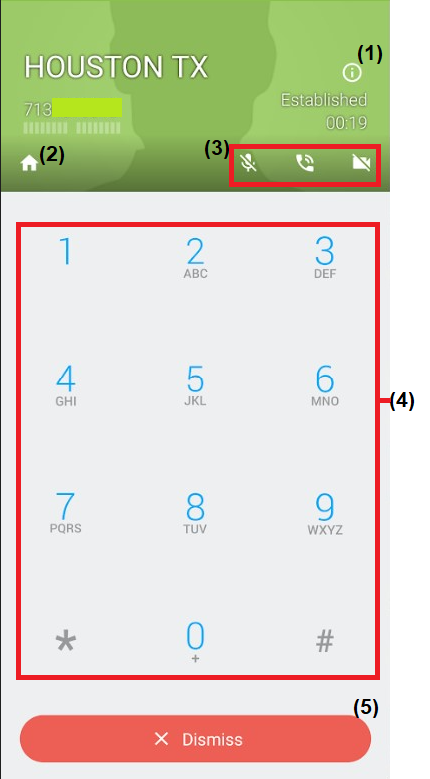
Touch the digits on the Keypad (4) to enter any inputs in a call. This can be useful for interacting with interactive voice menus, like auto attendants and voice mailboxes.
You can also…
- Monitor the call's metrics using the Information icon (1).
- Exit the active call screen to view the app's tabs using the Home icon (2).
- Control the call using the Mute , Speakerphone
 , and Camera icons (3)
 - Hide the keypad using the Dismiss button (5).