Access the Profile Settings
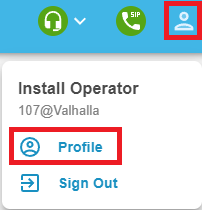
To review your Profile and its settings…
- Click the User icon.
- Select Profile.
Update Your Profile Settings
Personal Information
Using the desktop app's Profile Settings, you can update your Personal Information any time you need to:
- First Name and Last Name * - Update your name for the app.
- Timezone - Use this drop-down to select the time zone that the app will reference.
- User's Scope - View your user scope that has been set in the Primecall web portal.
- Email * - Add or update the email address that is used for password resets.
- Click the Add button
 to add an additional email address.
- Click the Add button
- Delivery Options - Edit how your name should be shown to callers and coworkers.
- Announce in Audio Directory - If necessary, allow or disallow the dial-by-name directory your organization may use to announce your name to callers.
- List in Directory - Show or hide your name from the Directory feature of your coworkers' phones.
Caller ID Information
In some circumstances, it may be necessary to adjust the Caller ID Information your phone references and displays.
✔ Doing this can be useful for users that…
- Have their own Direct Inward Dialing (DID) number to use for their Caller ID.
- Need to switch between different phone numbers for their Caller ID in certain situations.
- Need their phones to dial the last 7 digits of local numbers easily with a specific Area Code.
- Should display a different phone number and address of a certain site for their Emergency Caller ID.
In the Profile Settings of the app, you can adjust your Caller ID Information:

- Area Code * - Set the first 3 digits that the app will add on when you dial the last 7 digits of other phone numbers that use the same area code.
For example… If my area code is set as 469, I can dial 4-2-9-2-5-0-0 to call the PrimeCall technical support team (844.59PRIME (844.597-7463)).
- Caller ID - If you own multiple numbers, select which phone number should be shown to callers.
- Emergency Caller ID - Ensure that a phone number is set to be shown to emergency responders when you call 9-1-1.
Change Account Security
In the Profile Settings of the app, you can update your password that you use to login to the app and the Primecall web portal.
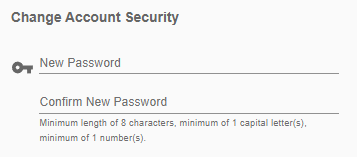
✔ It is recommended to update your password periodically to ensure your account stays secure.
Change Voicemail Pin
The Profile Settings of the app also allow you to update the Voicemail PIN that secures your mailbox.

✔ This is useful for users that…
- Forgot their voicemail PIN.
- Update their security information periodically.
- Are inheriting this extension from a previous user.
Emergency Address Configuration
If you use the desktop app at a different site or remotely from home, it is essential to update the address it uses for your Emergency Caller ID. Multiple addresses can be saved so that you can switch addresses when you use the app at different locations.
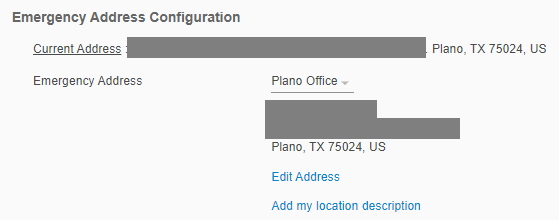
It is recommended to update or switch your emergency address when you…
- First install and open the app.
- Move locations/sites.
- Start working remotely from home.
Quick Tip: This Emergency Address and your Emergency Caller ID phone number are shown to dispatchers when you call 9-1-1 for any emergencies.
DANGER: Not adding in your apps' current address can result in issues and delays in getting emergency responders to your location!
Avoid this risk by keeping your emergency address information up-to-date.
Add a New Address
- Click the Emergency Address drop-down and select Add a new address.
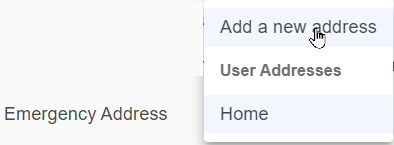
- In the boxes that appear, fill in the following information:
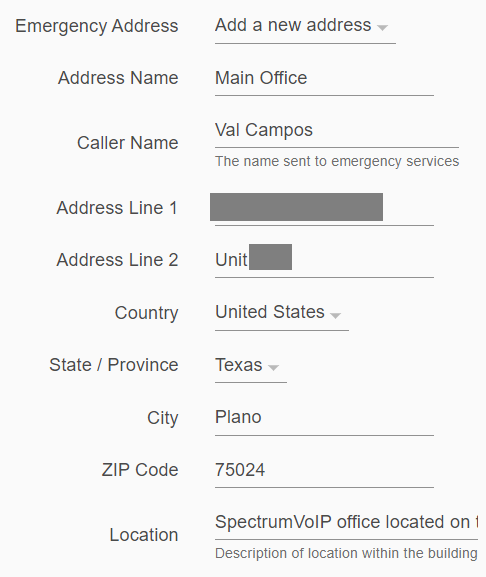
- Address Name - A unique, descriptive name for the address that will be seen in the Emergency Address drop-down when you select addresses for the app.
- Caller Name - Type in your first and last name that emergency responders should see when dispatchers answer your emergency call.
- Address Line 1 - Type in the street number and name where you are located.
- Address Line 2 - If necessary, type in the building, unit, or apartment number you are located at.
- Country - The United States is the only option available for provisioning for the app's emergency address.
NOTE: If you live in a different country, please contact our technical support team.
- State / Province - The state your office/home is located.
- City - The city your office/home is located.
- ZIP Code - Your office/home's ZIP code.
- Location - Type in a brief description of where exactly your office/home is located.
Note: This description can be up to 60 characters long.
Warning: If the location description is longer than 60 characters, you will receive an error when you validate the address in the next step.
- To confirm the address is correctly formatted, click the VALIDATE button.

✔ If all of the address' information is correct, you will see a notification that the address has been confirmed and applied.

- Click the SAVE button.

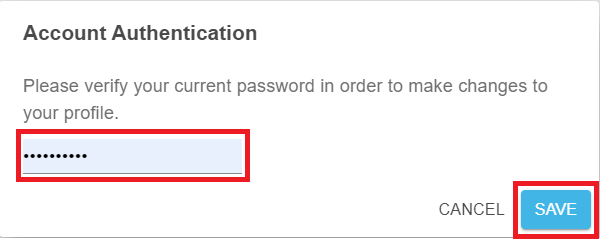
- In the Account Authentication window, type in your app's current password and click the SAVE button.
Switch Emergency Addresses
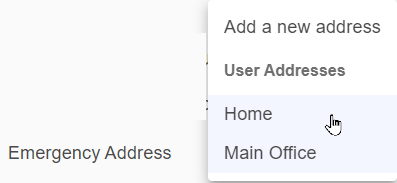
When you have multiple emergency addresses added, you can use the Emergency Address drop-down to select one of your address and click the SAVE button.

✔ It is recommended to re-select your emergency address when you…
- Move locations/sites.
- Start working remotely from home.
Edit an Address
At any time, your emergency addresses can be updated for accuracy,
To update the information for one of your emergency addresses…
- Use the Emergency Address drop-down to select the address that needs to be edited.
- Click Edit Address.

- Update the address and its information as needed.
- To confirm the address is correctly formatted, click the VALIDATE button.

✔ If all of the address' information is correct, you will see a notification that the address has been confirmed and applied.

- Click the SAVE button.

- In the Account Authentication window, type in your app's current password and click the SAVE button.

Update Address Name and Location
To only update the Address Name or Location description…
- Click Add my location description.

- Update the Address Name and Location information as needed.

- Click the SAVE button.

- In the Account Authentication window, type in your app's current password and click the SAVE button.
