Access the App
The Primecall App can be found at app.primecall .com on your web browser.
Quick Tip: This browser can be Google Chrome or another Chromium-based web browser like Chromium, Microsoft Edge, Brave, or Opera.
Download the App
While the PrimeCall App is able to be used within the web browser, it works best when downloaded as an application (app) on your computer.
To do this…
- Click on the Install PrimeCall icon at the top of the browser within the search bar.
- In the Install app? prompt, click Install.
✔ After the app is installed, the browser should pop up a notification mentioning the app was downloaded/added:
The Desktop App should automatically open as well.
Log In
When launching the PrimeCall Mobile App for the first time, you will be presented with the login screen.
There are three different ways to log in: using your username and password, your Google account, or your Office 365 account.
To log in using your Primecall account's credentials…
- Use the Username box to type in your login name for the Primecall web portal.
- Use the Password box to type in your Primecall password.
- Click the LOGIN button.
✔ After your initial login, this data will be stored and not be requested again unless you log out
Sign Out
You can sign out of the app by clicking the User icon and selecting Sign Out.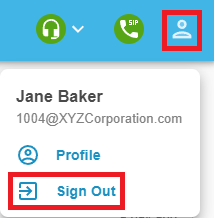
Use the PrimeCall Desktop App/Website
Full Screen View
The Full Screen view takes advantage of the longer width by stacking modules side-by-side.
The menu can be left as always visible or stowed away by clicking on the back arrow in the top left-hand corner of the screen.
App/Condensed View
The condensed view looks similar to a smart phone app.
The menu options are located in the top left-hand corner of the window.
Note: The desktop app will have a custom Toolbar at the top that provides handy tools to use to perfect your experience using the softphone app. The Web version will have the browser's own search bar present.
Status Indicators

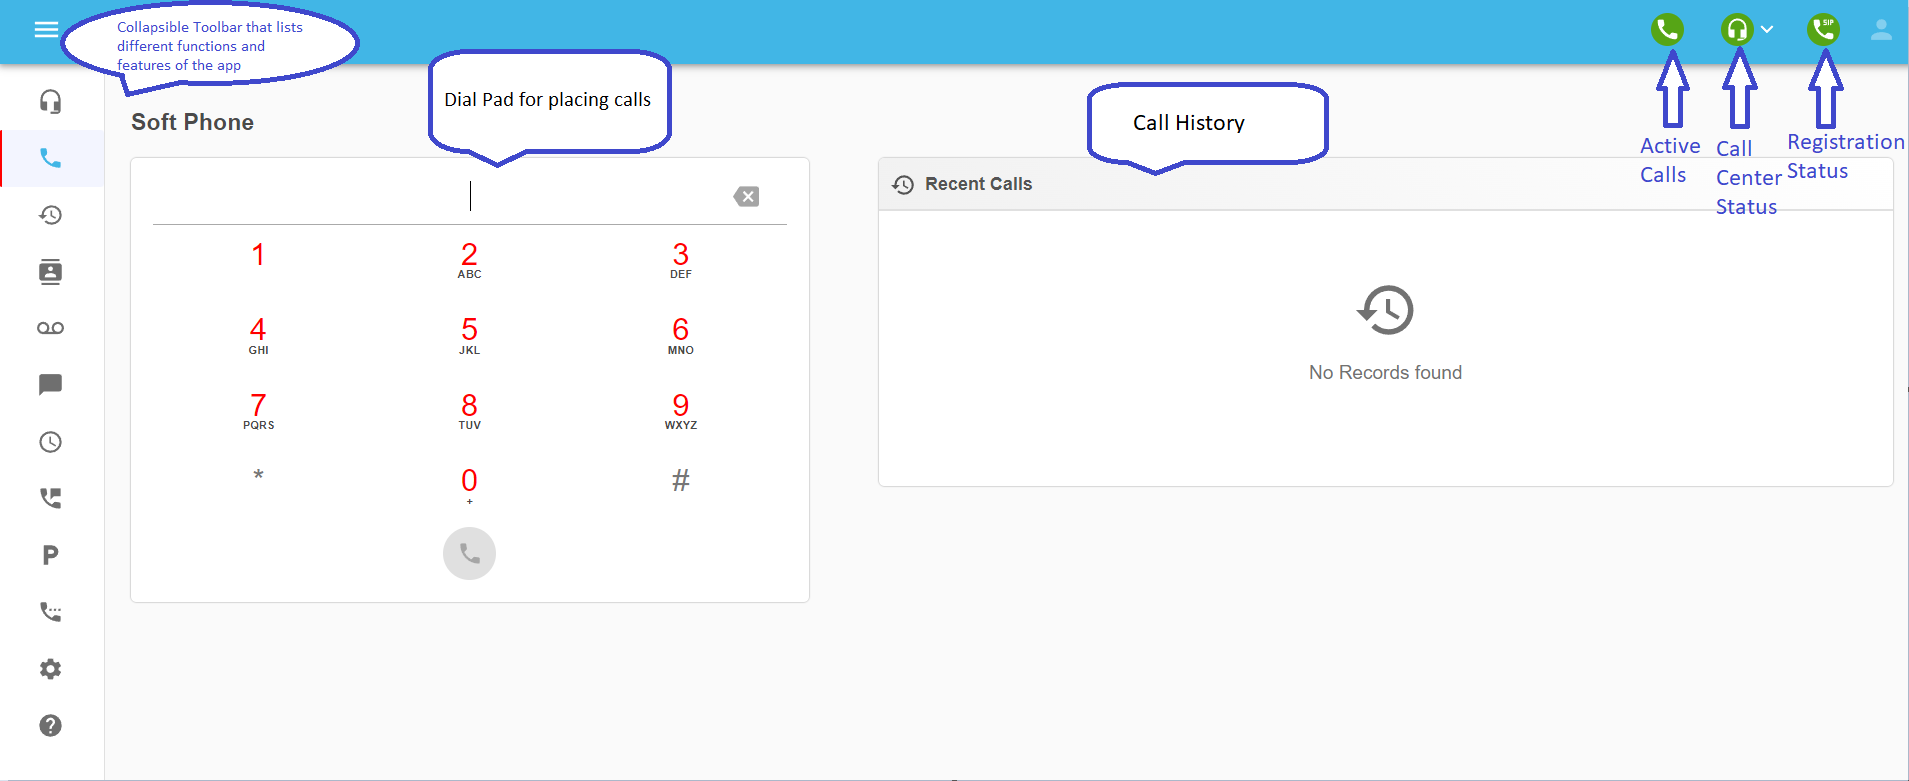
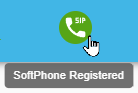
Registration Status
The Phone icon with the word SIP is an indicator of your softphone’s current registration status.
- Green - Your softphone is registered. You should be able to make calls.
- Red - Your softphone is not registered. This could be due to a local internet issue or because you have not allowed the app to have access to your microphone.
Call Center Status
The Call Center Status indicator and drop down is only available for users whose scope is "Call Center Agent" or "Call Center Supervisor".
Clicking on the Call Center Status drop-down allows you to change your status in the call queue.
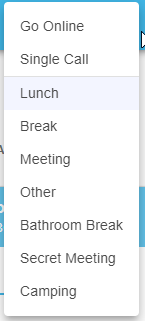
Quick Tip: Custom Statuses can be created by an Office Manager or Call Center Supervisor.
The color of the Call Center Status icon indicates your current status in the queue.
- Green - You are set as Online so that you can handle calls from your queue.
- Red - You are currently set as Offline.
- Grey - Your call center status is set as Other.
- Yellow -Your status is set as Lunch, Meeting, Break, etc.


Features and Functions of the PrimeCall Softphone App
The toolbar running down the left is expandable and collapsible. This toolbar is the key to navigating through the different features of the PrimeCall app.
For both the Full Screen and Condensed views of the app, the toolbar is collapsible using two icons:
- Expand Toolbar -
- Collapse Toolbar -


Here is how the Toolbar looks when expanded: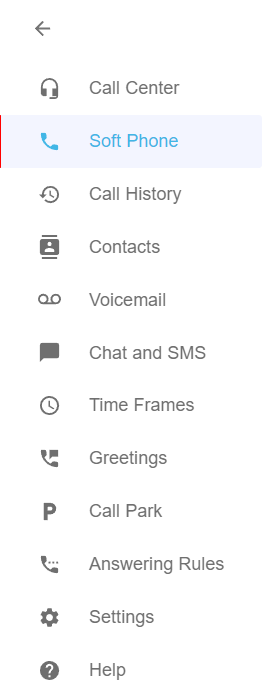
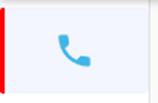
Soft Phone
In the Soft Phone page, you can use the Dial Pad to contact others and view your Recent Calls.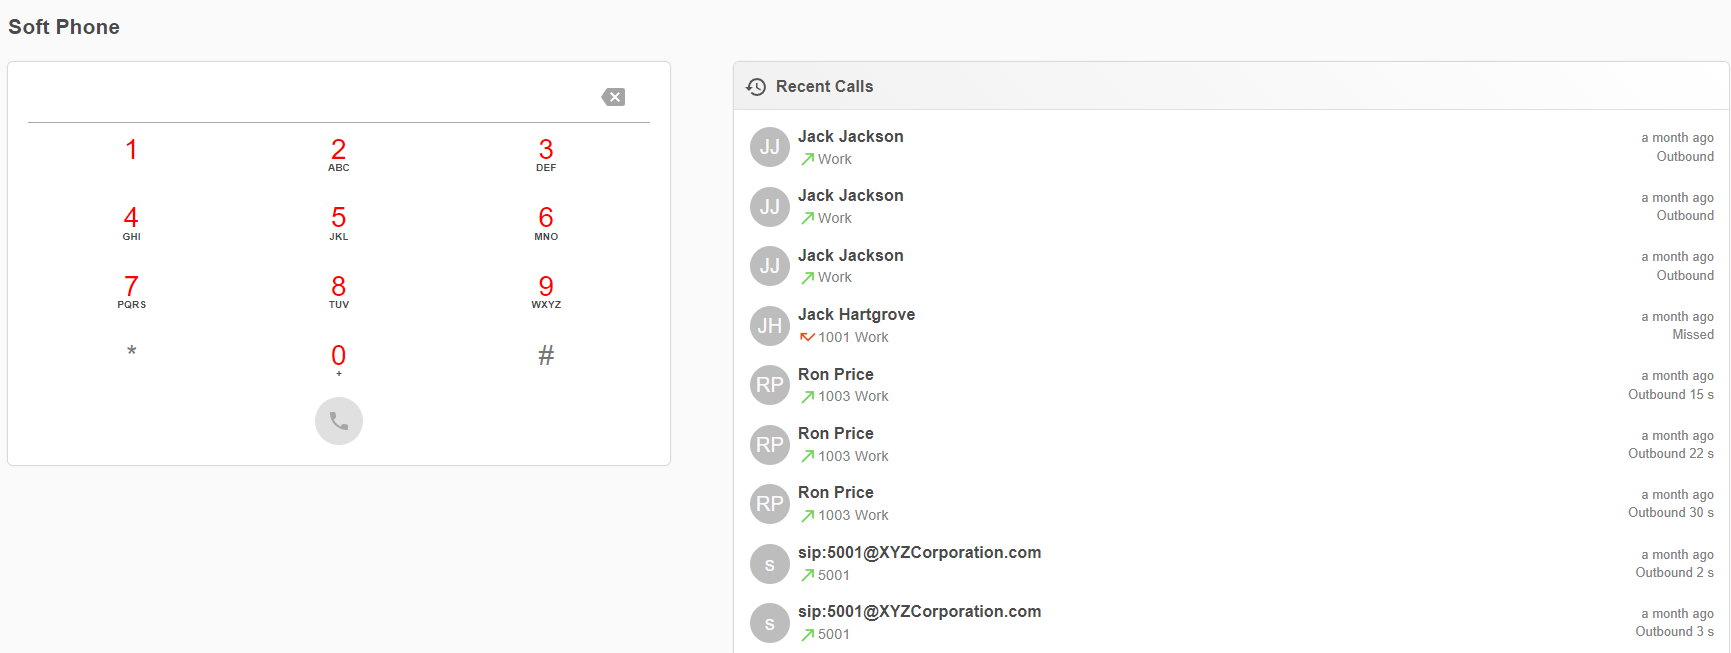
Place a Call
Just like with a desk phone or the mobile app, you can dial coworkers' extension numbers, external phone numbers, etc. using the dial pad feature.
There are three ways to place a call to someone using the Soft Phone page…
- Use your keyboard or mouse to dial the other person's phone number or extension number and press the Dial button.

- Use your keyboard to type in the name of a contact and click the contact shown in the Search section.

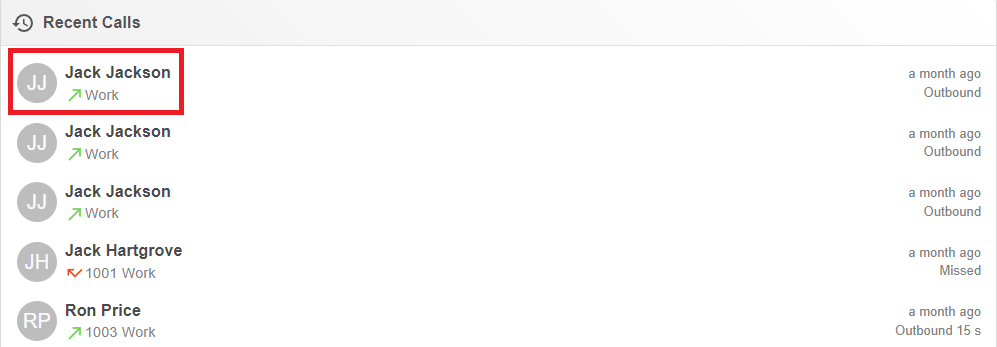
- Click on an entry in the Recent Calls section.
Receive a Call
When there is an incoming call, the Caller ID of the caller will be displayed alongside the Accept  , Ignore
  , and Decline
  buttons.
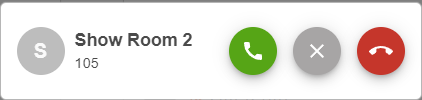
If you have enabled notification permissions, you can also get a notification from your computer that allows you to either Answer or Reject the call.
Active Calls
An Active Call will have a pop-up that offers different in-call features:
- Mute – Disables the microphone.
- Hold – Places the other party on hold.
- Dial Pad – Pulls up the DTMF dial pad so that digits can be entered during a call.
- Add Call – Enables you to create a second call that is separate from the first call. Once the second call is established the calls can be merged into a three-way conference or kept separate with the ability to swap between calls.
- Transfer Call - When clicked, you can select between doing a Blind Transfer or an Assisted Transfer.

- Blind Transfer - Do a blind transfer to send a call to another destination without speaking to the person taking the transfer.
- Assisted Transfer - Use an assisted transfer to speak with the person you want to transfer the call to before completing a transfer.
- Start Rec - If Call Recording is enabled,
- When clicked, a REC notice
 will appear above the duration of the call.
- When clicked, a REC notice
- Pause Rec - Allows you to pause your recording of the call.
- The REC notice will show a pause symbol:

Quick Tip: Click Resume Rec to continue recording the call.
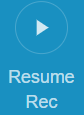
- The REC notice will show a pause symbol:
- Stop Rec - Click this to stop recording a call.
- The REC notice
 will disappear:
- The REC notice
- Call Park - Select how to park a call.
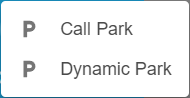
- Call Park - Click this to select which park queue the call should be transferred to.
- Dynamic Park - Click this to have the app choose where to park the call for you.

- Call Park - Click this to select which park queue the call should be transferred to.
- Switch Phone - Move the active call to another one of your phones that is connect.
- Clicking this will show a list of connected phones to choose from.

- Clicking this will show a list of connected phones to choose from.
- Hide - Minimizes the active call options window.
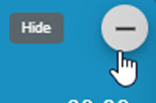
- The active call options can be brought back by clicking on the Back to Call button.
- The active call options can be brought back by clicking on the Back to Call button.

Call Center

Depending on your Scope, there may not be anything visible in the My Queues portion of the Call Center modal.
If you are set as a Call Center Agent, Call Center Supervisor, or Office Manager, then you will be able to view the call queues you are in.
When you select a call queue, you can use the modal on the right to…
- View the callers waiting in the queue using the WAITING tab.

- Check the status of other agents in the queue using the AGENTS tab.

Warning: If your User's Scope is not set specifically as a Call Center Agent or Supervisor, then the view of this tab will be empty like this: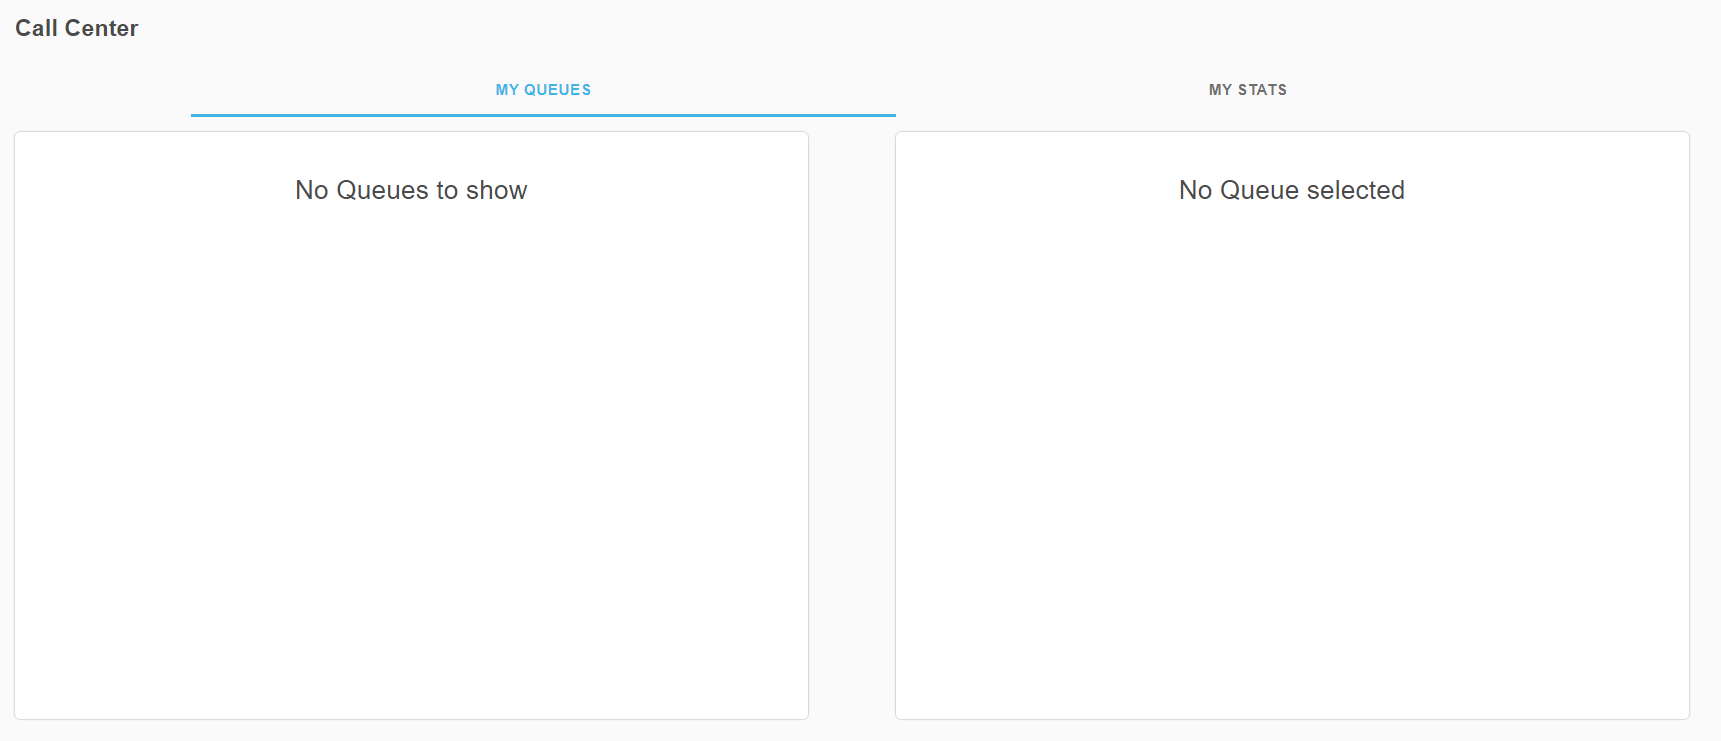
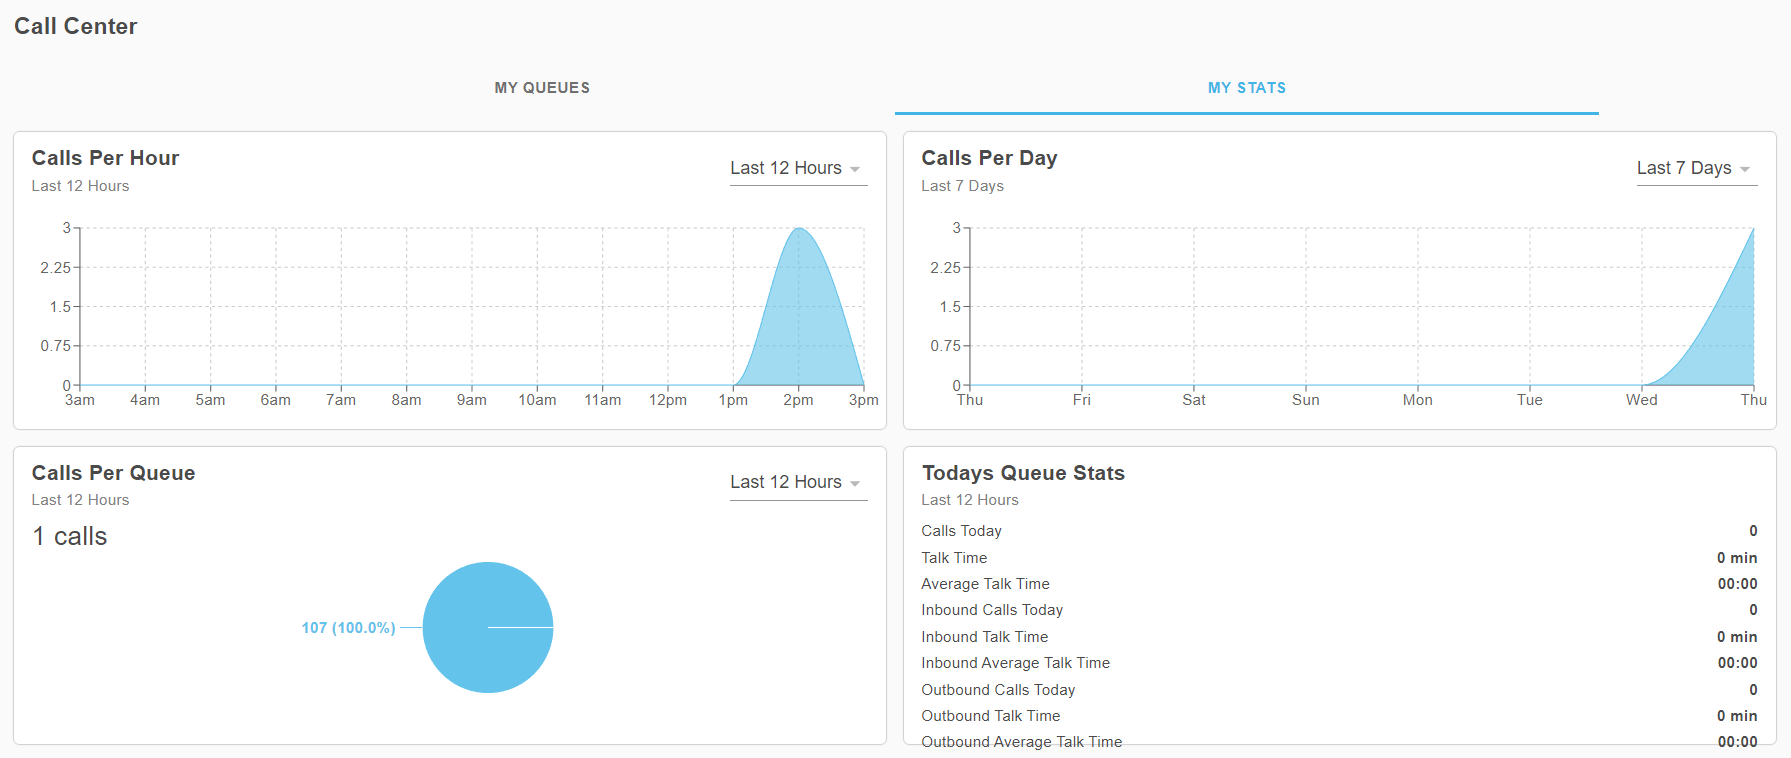
Even if your User is not set specifically as a Call Center Agent or Call Center Supervisor, the My Stats section will still show any relevant Call Center and Call Queue Statistics:
Call History

The Call History page allows you to view and filter your recent calls.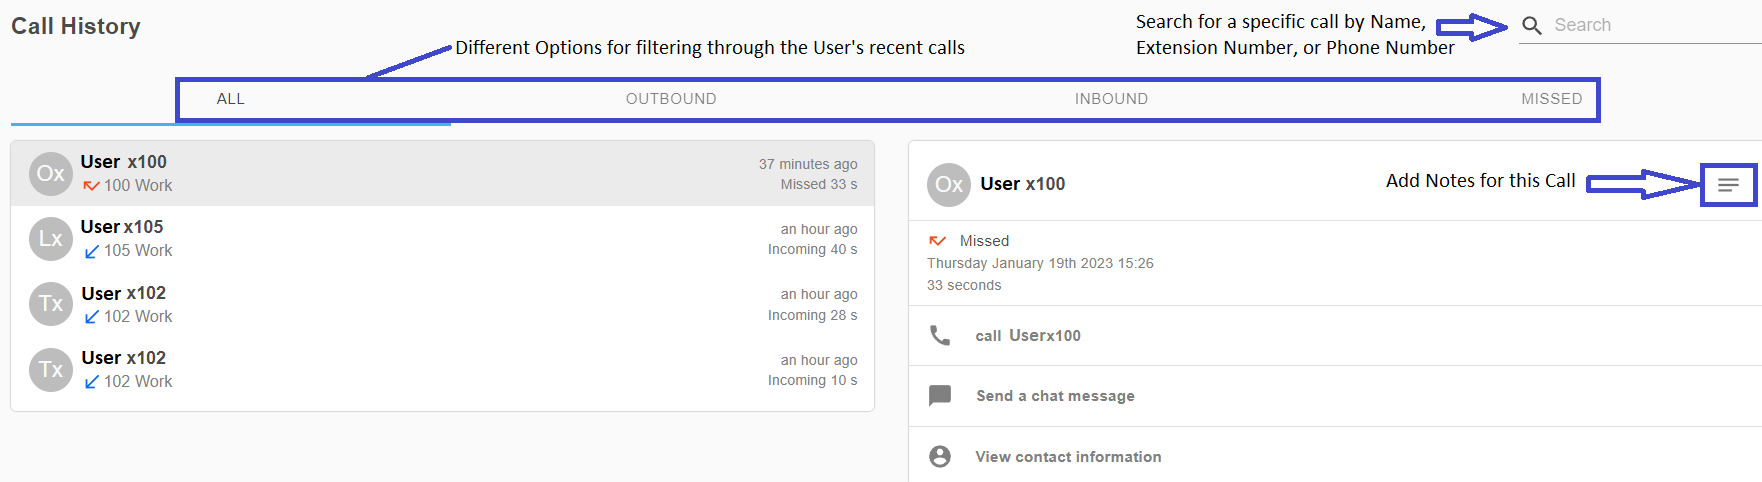
On this page, you have options to…
- Search for a specific call using a caller name, extension number, or phone number.
- View details about a call, such as the time and date of the call, duration of the call, and the type of call (e.g., Missed, Inbound, or Outbound)
- Options to either Call or Send a chat message to a caller.
- View the Contact Information for a caller.
- Add notes about a call using the Add Notes
 button.
Contacts

The Contacts page will have a list of your Shared, Private, and Directory Contacts on the left where a certain contact can be selected.
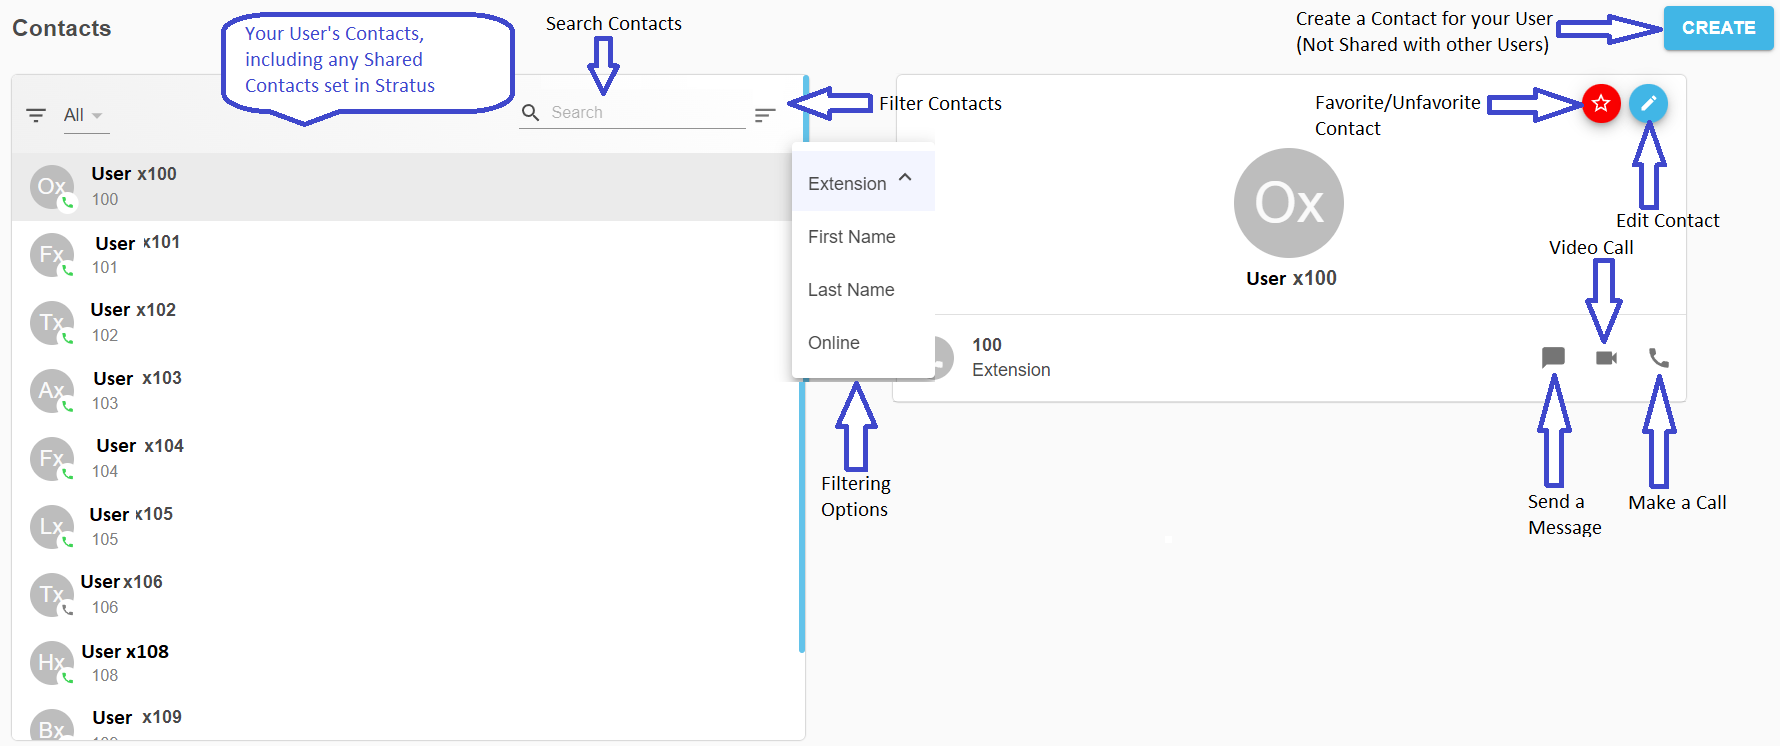
On the left, you can find and select a contact by…
- Using the Search bar.
- Clicking the Filter button to find a contact by Extension, First Name, Last Name, or their Online status (internal users only).
On the right, you can view and manage a selected contact by…
- Editing the contact.
- Favoriting the contact.
- Reaching out to a contact by sending a message, video calling, or making a call.
There is also a button for creating new contacts that are only visible to you. These contacts created through the app are not shared so they will not appear for other Users of the organization.
Voicemail

In the Voicemail page, you can manage and listen to voicemails. 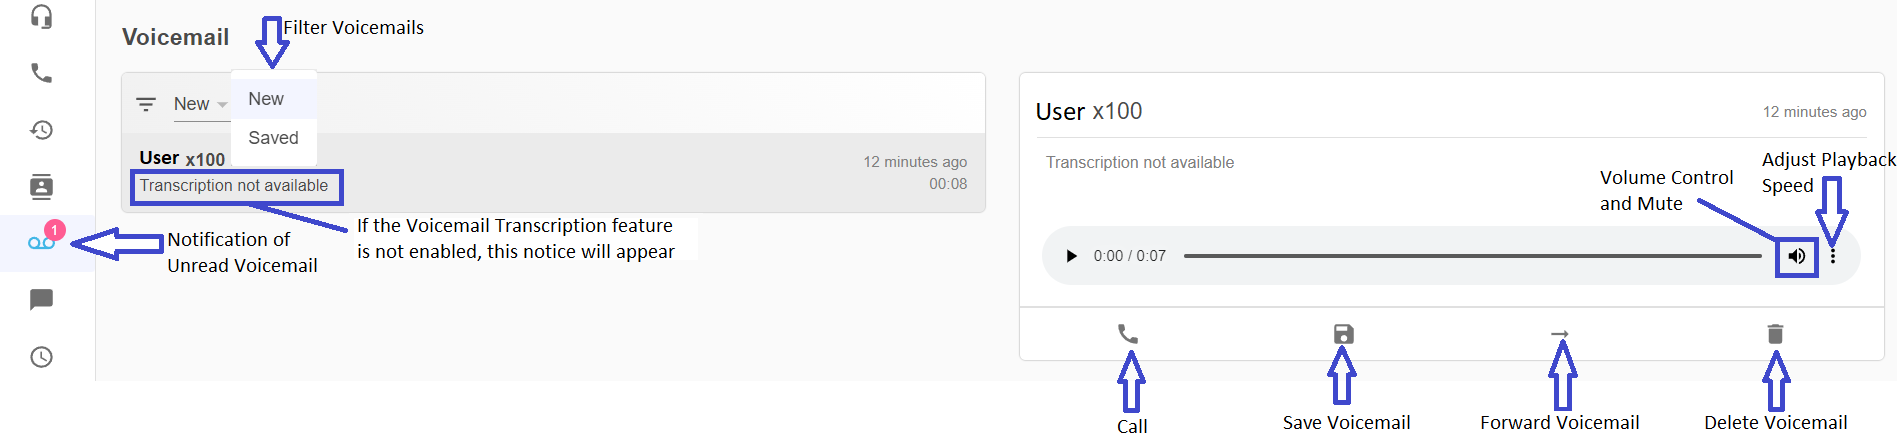
Voicemails can be Saved, Forwarded to another extension, and Deleted. You can also view Voicemail Transcriptions if they have been enabled by and admin of your business and our technical support team.
Warning: If Voicemail Transcriptions are not yet enabled for you, then there will be a notice that states “Transcription not available”
To explore your options for enabling voicemail transcriptions, please have an admin for your account contact our technical support team.
Note: If your mailbox does not have any voicemails, then the Voicemail section will be empty: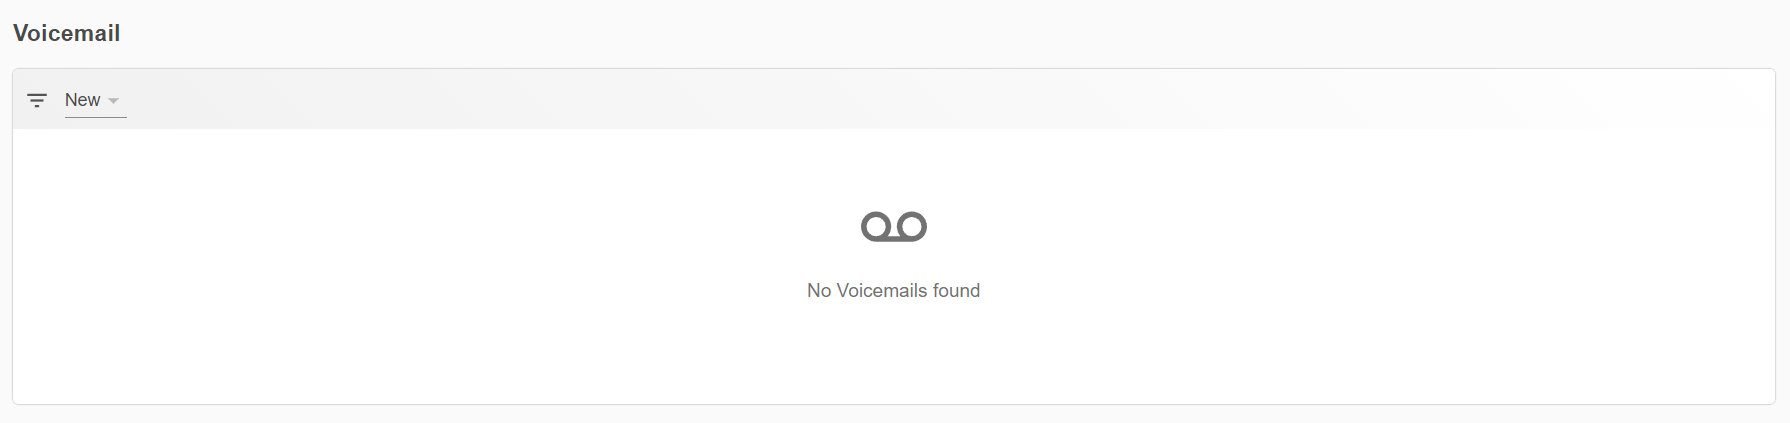
Chat and SMS

If you have any Chats from coworkers or any SMS messages, they will appear in the Chat and SMS page of the desktop app:

This interface allows you to not only send Chat and SMS message back and forth; it also allows you to insert a document, picture, use emojis, and even start a video call.
Note: If you do not have any Chats or SMS messages, then the modal will appear empty like so:
You can click the NEW button to start a new conversation. The New Conversation menu will appear to let you search for the recipient and type out a message:

DANGER: If SMS is being used, you must adhere to our Privacy Terms.
To learn more about enabling SMS, registering for a SMS Campaign, and the charges associated with SMS/MMS messaging, feel free to read this article regarding these recent guideline changes.
The interface for SMS messaging will look exactly the same as it does for the Chat feature.

Quick Tip: The messaging interface also has a scrollable list of certain features and settings that can be used and adjusted for the selected chat/SMS conversation:
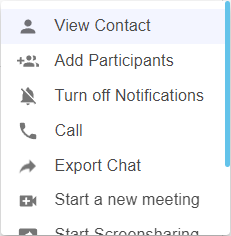
These options can be accessed by clicking the More Options  icon for a conversation.
Export Chat and SMS Messages
In some circumstances, it may be necessary to export a .CSV file of a conversation's messages.
To do this…
- Select and view the conversation.
- Click the More Options
 icon for the conversation.
- Select Export Chat.

- In the Export Chat Messages window, click the Calendar
 icons to set the date range for the messages to be pulled.
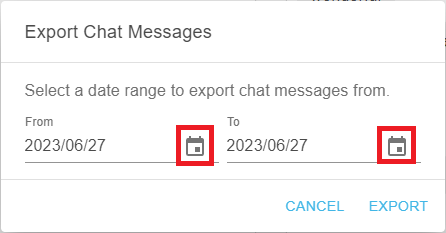
- Click EXPORT.
✔ A spreadsheet of the messages from that conversation from the date you chose should be downloaded to your PC.

- In order to open this spreadsheet, the file that downloaded will need to be Extracted.
To extract the file…- Navigate to the Downloads folder of your PC.
- Right-click the zipped file.
- Select Extract All…
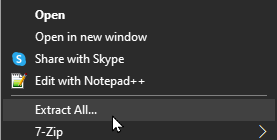
- Open the newly unzipped copy of the folder.
✔ Now you should be able to open the spreadsheet to view the messages.
Time Frames

Time Frames are utilized by Answering Rules to lay out the times/dates that these rules are active for routing/forwarding purposes. The Time Frames section will show information for that User's own Time Frames (name, type of time frame, and the domain that owns it).
Warning: The Time Frame section of the PrimeCall App will only show time frames that were created by you.
Time frames in use by the whole organization can only be edited and viewed in Primecall by Users with a high enough User Scope (i.e., Office Managers and Site Managers)
You can adjust your existing Time Frames by clicking the Edit button. Time Frames can also be deleted in this menu.

NOTE: If there are not any Time Frames created by you, then the Time Frames section will look empty.

How to Add in a Time Frame using the PrimeCall App
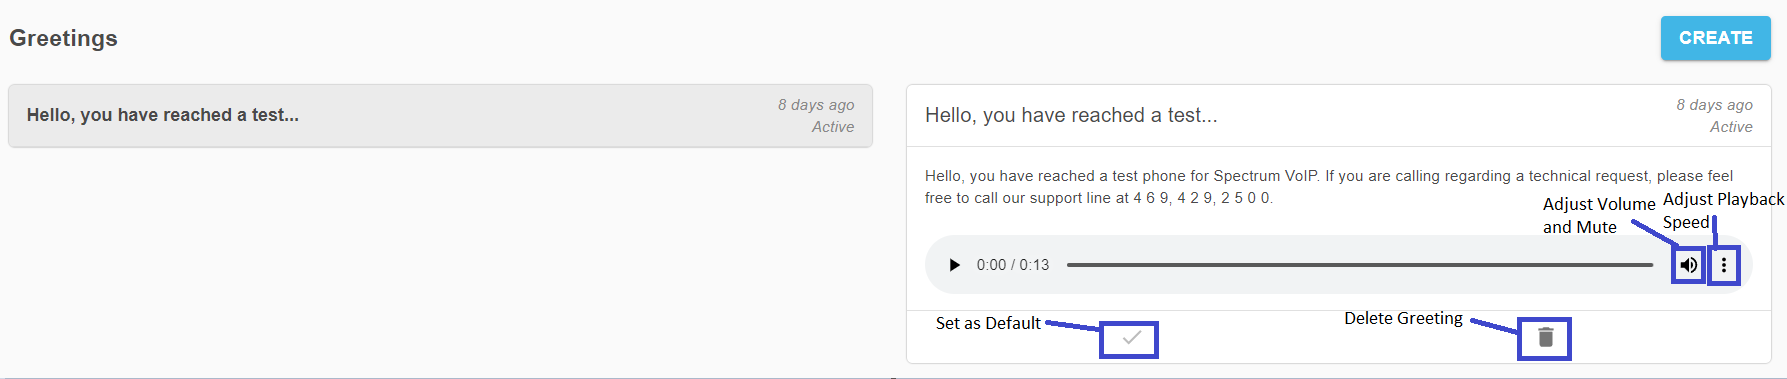
Greetings

The Greetings section will show a list of your voicemail greetings. On the right, you can play your greeting, set a default greeting, or delete a greeting.
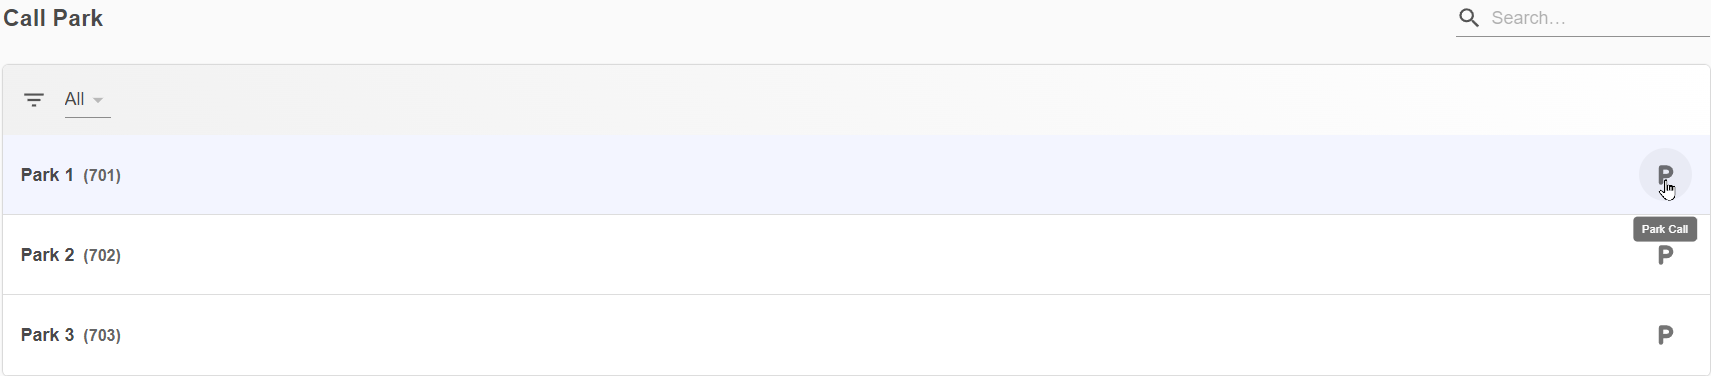
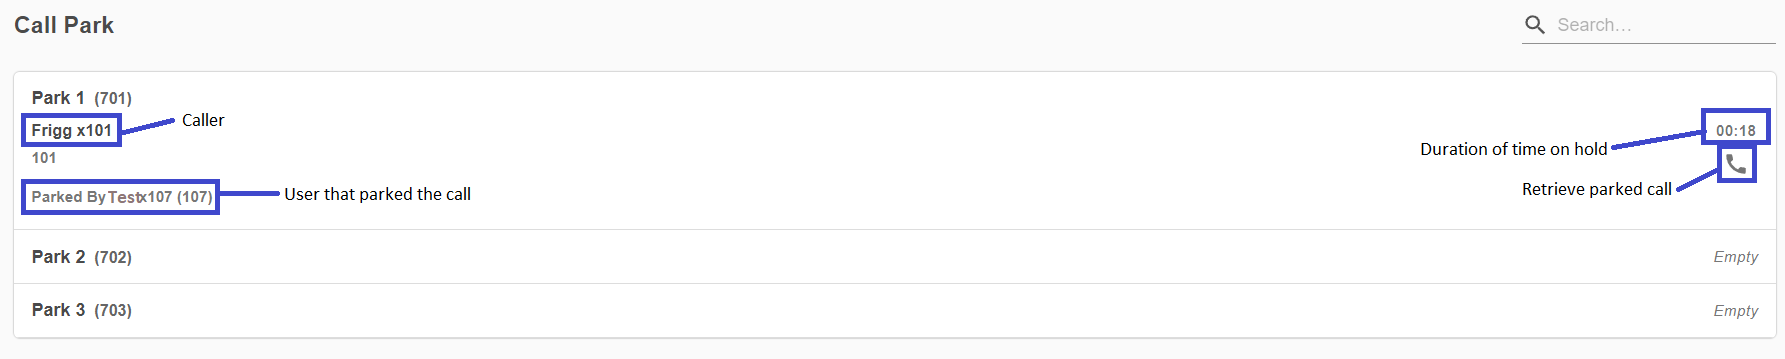
Call Park

The Call Park section of the App allows you to see the status of your call park queues and view any calls that are currently parked.
How to Park Calls in the PrimecallVoIP App
Answering Rules

The Answering Rules section is where all of the Time Routing takes place. The answering rules refer to the time frames that are set to determine where a call should be routed. 
NOTE: Since time frames are essential for the functionality of the Answering Rules, answering rules can only be added if there is another time frame available for the User.
How to Add an Answering Rule on the App
Update Your Profile Settings
Access Your Profile Settings
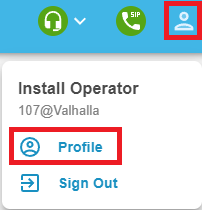
To review your Profile and its settings…
- Click the User icon.
- Select Profile.
Personal Information
Using the desktop app's Profile Settings, you can update your Personal Information any time you need to:
- First Name and Last Name * - Update your name for the app.
- Timezone - Use this drop-down to select the time zone that the app will reference.
- User's Scope - View your user scope that has been set in the Primecall web portal.
- Email * - Add or update the email address that is used for password resets.
- Click the Add button
 to add an additional email address.
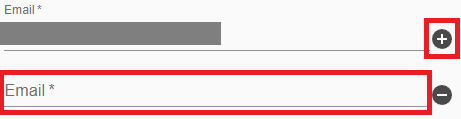
- Click the Add button
- Delivery Options - Edit how your name should be shown to callers and coworkers.
- Announce in Audio Directory - If necessary, allow or disallow the dial-by-name directory your organization may use to announce your name to callers.
- List in Directory - Show or hide your name from the Directory feature of your coworkers' phones.
Caller ID Information
In some circumstances, it may be necessary to adjust the Caller ID Information your phone references and displays.
✔ Doing this can be useful for users that…
- Have their own Direct Inward Dialing (DID) number to use for their Caller ID.
- Need to switch between different phone numbers for their Caller ID in certain situations.
- Need their phones to dial the last 7 digits of local numbers easily with a specific Area Code.
- Should display a different phone number and address of a certain site for their Emergency Caller ID.
In the Profile Settings of the app, you can adjust your Caller ID Information:

- Area Code * - Set the first 3 digits that the app will add on when you dial the last 7 digits of other phone numbers that use the same area code.
For example… If my area code is set as 469, I can dial 4-2-9-2-5-0-0 to call the PrimeCall technical support team (844.59PRIME (844.597-7463)).
- Caller ID - If you own multiple numbers, select which phone number should be shown to callers.
- Emergency Caller ID - Ensure that a phone number is set to be shown to emergency responders when you call 9-1-1.
Change Account Security
In the Profile Settings of the app, you can update your password that you use to login to the app and the Primecall web portal.
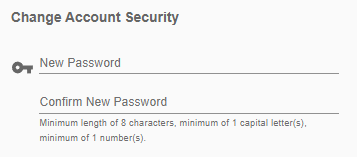
✔ It is recommended to update your password periodically to ensure your account stays secure.
Change Voicemail Pin
The Profile Settings of the app also allow you to update the Voicemail PIN that secures your mailbox.

✔ This is useful for users that…
- Forgot their voicemail PIN.
- Update their security information periodically.
- Are inheriting this extension from a previous user.
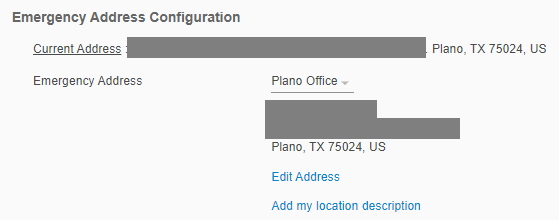
Emergency Address Configuration
If you use the desktop app at a different site or remotely from home, it is essential to update the address it uses for your Emergency Caller ID. Multiple addresses can be saved so that you can switch addresses when you use the app at different locations.
It is recommended to update or switch your emergency address when you…
- First install and open the app.
- Move locations/sites.
- Start working remotely from home.
Quick Tip: This Emergency Address and your Emergency Caller ID phone number are shown to dispatchers when you call 9-1-1 for any emergencies.
DANGER: Not adding in your apps' current address can result in issues and delays in getting emergency responders to your location!
Avoid this risk by keeping your emergency address information up-to-date.
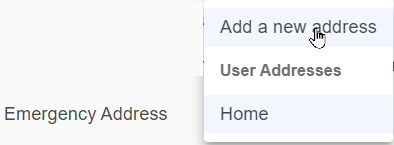
Add a New Address
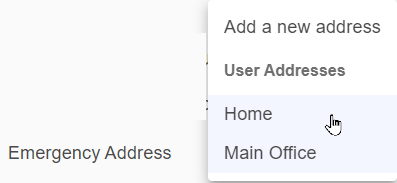
- Click the Emergency Address drop-down and select Add a new address.
- In the boxes that appear, fill in the following information:
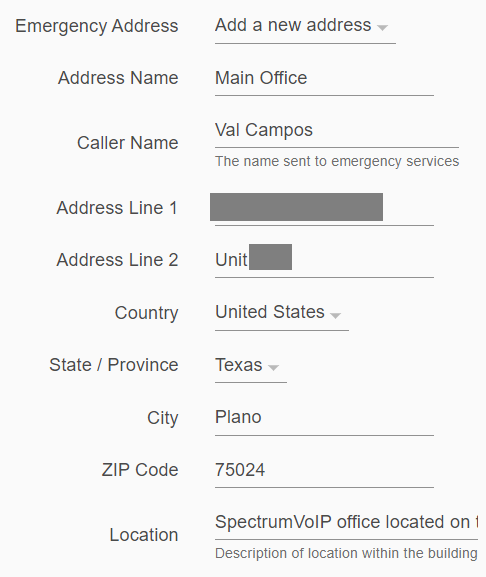
- Address Name - A unique, descriptive name for the address that will be seen in the Emergency Address drop-down when you select addresses for the app.
- Caller Name - Type in your first and last name that emergency responders should see when dispatchers answer your emergency call.
- Address Line 1 - Type in the street number and name where you are located.
- Address Line 2 - If necessary, type in the building, unit, or apartment number you are located at.
- Country - The United States is the only option available for provisioning for the app's emergency address.
NOTE: If you live in a different country, please contact our technical support team.
- State / Province - The state your office/home is located.
- City - The city your office/home is located.
- ZIP Code - Your office/home's ZIP code.
- Location - Type in a brief description of where exactly your office/home is located.
Note: This description can be up to 60 characters long.
Warning: If the location description is longer than 60 characters, you will receive an error when you validate the address in the next step.
- To confirm the address is correctly formatted, click the VALIDATE button.

✔ If all of the address' information is correct, you will see a notification that the address has been confirmed and applied.

- Click the SAVE button.

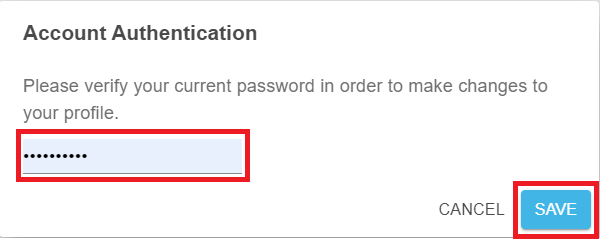
- In the Account Authentication window, type in your app's current password and click the SAVE button.
Switch Emergency Addresses
When you have multiple emergency addresses added, you can use the Emergency Address drop-down to select one of your address and click the SAVE button.

✔ It is recommended to re-select your emergency address when you…
- Move locations/sites.
- Start working remotely from home.
Edit an Address
At any time, your emergency addresses can be updated for accuracy,
To update the information for one of your emergency addresses…
- Use the Emergency Address drop-down to select the address that needs to be edited.
- Click Edit Address.

- Update the address and its information as needed.
- To confirm the address is correctly formatted, click the VALIDATE button.
✔ If all of the address' information is correct, you will see a notification that the address has been confirmed and applied.
- Click the SAVE button.
- In the Account Authentication window, type in your app's current password and click the SAVE button.
Update Address Name and Location
To only update the Address Name or Location description…
- Click Add my location description.

- Update the Address Name and Location information as needed.

- Click the SAVE button.
- In the Account Authentication window, type in your app's current password and click the SAVE button.
Configure the Desktop App's Settings

General Settings
There a several Togglable settings under the General section of Settings.
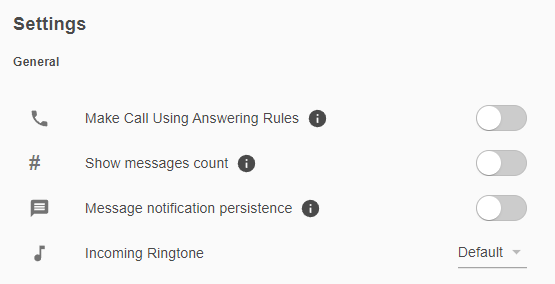
Make Call Using Answering Rules
When this option is enabled, your answering rules will be followed.
✔ This will alert all devices connected to your user.
Show Message Count
When this option is enabled, the app will show your total number of chat messages and texts.
Note: By default, the app will only show how many unread conversations there are.
Message Notification Persistence
When this setting is enabled, the new message/text notification will stay on screen until an action is performed.
Incoming Ringtone
Use the drop-down  to choose a different ringtone for your app.
HID Devices
An HID, or Human Interface Device, is a standard for computer devices that allows devices to be operated by humans without the assistance of extra software or drivers. Some models of headsets are HID-compliant and can be specially set up to work with the PrimecallVoIP desktop app.
To set up an HID-compliant headset in the desktop app's General settings…
- Connect an HID-compliant headset to your PC.
- In the New device found notice that pops up, click YES.
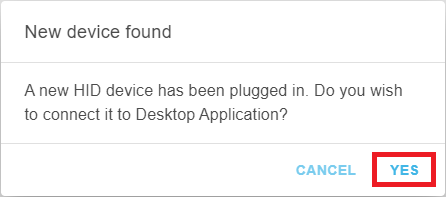
- In the HID Devices section of the General Settings, click the CONNECT button.

- In the notice that appears, click the device's name and then the Connect button.
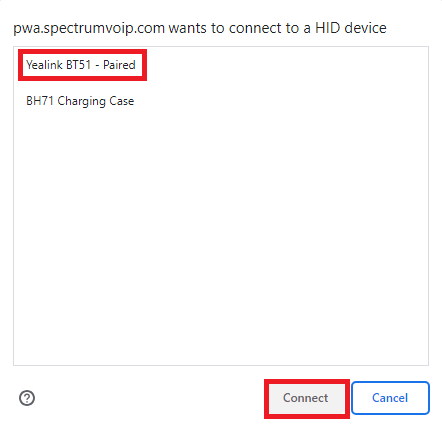
✔ The HID Devices section should update to show that your HID-compliant device is paired.

You can also hover over the tab in the browser that the desktop app is using to see a notice that an HID device is connected:
Emergency Address Configuration
If you use the desktop app at a different site or remotely from home, it is essential to update the address it uses for your Emergency Caller ID. Multiple addresses can be saved so that you can switch addresses when you use the app at different locations.
It is recommended to update or switch your emergency address when you…
- First install and open the app.
- Move locations/sites.
- Start working remotely from home.
Quick Tip: This Emergency Address and your Emergency Caller ID phone number are shown to dispatchers when you call 9-1-1 for any emergencies.
DANGER: Not adding in your apps' current address can result in issues and delays in getting emergency responders to your location!
Avoid this risk by keeping your emergency address information up-to-date.
Add a New Address
- Click the Emergency Address drop-down and select Add a new address.
- In the boxes that appear, fill in the following information:
- Address Name - A unique, descriptive name for the address that will be seen in the Emergency Address drop-down when you select addresses for the app.
- Caller Name - Type in your first and last name that emergency responders should see when dispatchers answer your emergency call.
- Address Line 1 - Type in the street number and name where you are located.
- Address Line 2 - If necessary, type in the building, unit, or apartment number you are located at.
- Country - The United States is the only option available for provisioning for the app's emergency address.
NOTE: If you live in a different country, please contact our technical support team.
- State / Province - The state your office/home is located.
- City - The city your office/home is located.
- ZIP Code - Your office/home's ZIP code.
- Location - Type in a brief description of where exactly your office/home is located.
Note: This description can be up to 60 characters long.
Warning: If the location description is longer than 60 characters, you will receive an error when you validate the address in the next step.
- To confirm the address is correctly formatted, click the VALIDATE button.
✔ If all of the address' information is correct, you will see a notification that the address has been confirmed and applied.
- Click the SAVE button.
- In the Account Authentication window, type in your app's current password and click the SAVE button.
Switch Emergency Addresses
When you have multiple emergency addresses added, you can use the Emergency Address drop-down to select one of your address and click the SAVE button.
✔ It is recommended to re-select your emergency address when you…
- Move locations/sites.
- Start working remotely from home.
Edit an Address
At any time, your emergency addresses can be updated for accuracy,
To update the information for one of your emergency addresses…
- Use the Emergency Address drop-down to select the address that needs to be edited.
- Click Edit Address.
- Update the address and its information as needed.
- To confirm the address is correctly formatted, click the VALIDATE button.
✔ If all of the address' information is correct, you will see a notification that the address has been confirmed and applied.
- Click the SAVE button.
- In the Account Authentication window, type in your app's current password and click the SAVE button.
Update Address Name and Location
To only update the Address Name or the Location description…
- Click Add my location description.
- Update the Address Name and Location information as needed.
- Click the SAVE button.
- In the Account Authentication window, type in your app's current password and click the SAVE button.
Audio Settings
In the Audio tab of the Settings page, you can select which Microphones, Speakers, and Ringer devices for the desktop app to use. Click the check boxes to select which device you would like the app to use.
Microphones
In the Microphones section, you can select which audio device should be used when you handle calls.

If you want to check if your microphone is picking up audio correctly, you can view the blue box on the right to see the strength of your audio through your microphone.
Speakers
In the Speakers section, you can select which audio device should play the audio for your calls.

You can also click the Test button to make sure audio is playing through the selected speakers correctly. 
Ringers
If you would like to have the app ring through a different device, select that device in the Ringers section.

Similar to the Speakers section, you can click the Test button to make sure the ringtone is playing through the selected speakers correctly.
Advanced Settings
The Advanced tab allows you to enable and configure call popups in the desktop app.

✔ Call Popups are useful when a CRM is being used to access customer data. Call popups display that customer information automatically when a call is received.
Enable Call Popups
To enable call popups, click the Call Popup toggle. 
Set When a Call Popup will Display
There are two settings for call popups that can be adjusted to fine-tune when a popup will appear for calls: Call Popup on and Call Popup Delay.

Call Popup On
Call Popups can appear when either a call is ringing or answered. To select which state of the call the call popup should display for, use the Call Popup on drop-down.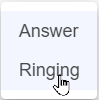
Note: By default, call popups will appear when an incoming call is answered.
Call Popup Delay
If you prefer for the call popup to wait before displaying, use the Call Popup Delay box to type in how many seconds the app should wait before displaying the popup. 
Call URL
enter any Call URL followed by a variable that will be replaced with the inbound calling phone number. When an inbound call is received, this URL is sent to your preferred browser which will perform this search.
Commonly Used Call URLs
Note: By default, the system will use Google to search for any information.
Help

This section of the app will feature any frequently asked questions, including how to have the app open on start-up and what Safe Mode is. 
Start App When Your Computer Turns On
Using the Chrome Browser
- Open your chrome browser.
- Navigate to chrome://apps.
- Right-click on the PrimeCall app.
- Select Start app when you sign in.
Using the Edge Browser
- Open your edge browser.
- Navigate to edge://apps.
- Click the More options
 icon for the PrimeCall app option.
 - Select Auto-start on device login.
Safe Mode
Safe Mode is triggered when a network issue does not allow the PrimeCall Desktop app to reach the web servers for API access. During this time, certain features that are normally serviced by the web servers are not available.
- Call History will not populate.
- Active call control section will not populate.
- Parking will not function.
- SMS will not function; however, chat is functional.
- Call Center Waiting Calls list will not populate.
- Call Center Agent list will not update status; however, logging in an out of queues is functional.
When Safe Mode is active, you will see a warning symbol next to the desktop app's status indicators.
When you hover over this warning symbol, you will see a warning notice:
You can click the warning symbol or the Click here link in the warning notice to view this information in your desktop app.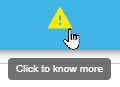 or
or 
Once the desktop app can stay connected, the warning symbol will disappear, and you will see a notice that the desktop app is in normal working condition:
Diagnostics
Diagnostics will be running several checks to detect the current state of the PrimeCall Desktop App by evaluating your Internet Speed, checking your connection with our Web Servers, and calculating a MOS Score.
- Internet Speed - It will check the internet speed on your system
- Server Connected - It will check whether the PrimeCall Desktop App is able to connect to our web server or not, or if the app is running in Safe Mode.
- MOS Score - MOS (Mean Opinion Score) Score tells us about the quality of the VoIP audio call, its value ranges from 1-5
- Very Good: 4.3-5.0
- Bad: 3.1-3.6
- Not Recommended : 2.6-3.1
- Very Bad: 1.0-2.6
To run a diagnostic check to see if your PC can reliably use the desktop app's services…
- In the Diagnostics section, click Run Diagnostics Checks.

- Click the START CHECKS button.

- Allow the app time to check each criteria's status.
✔ Once the diagnostic check is complete, you can view and share your results with your IT or MSP team.
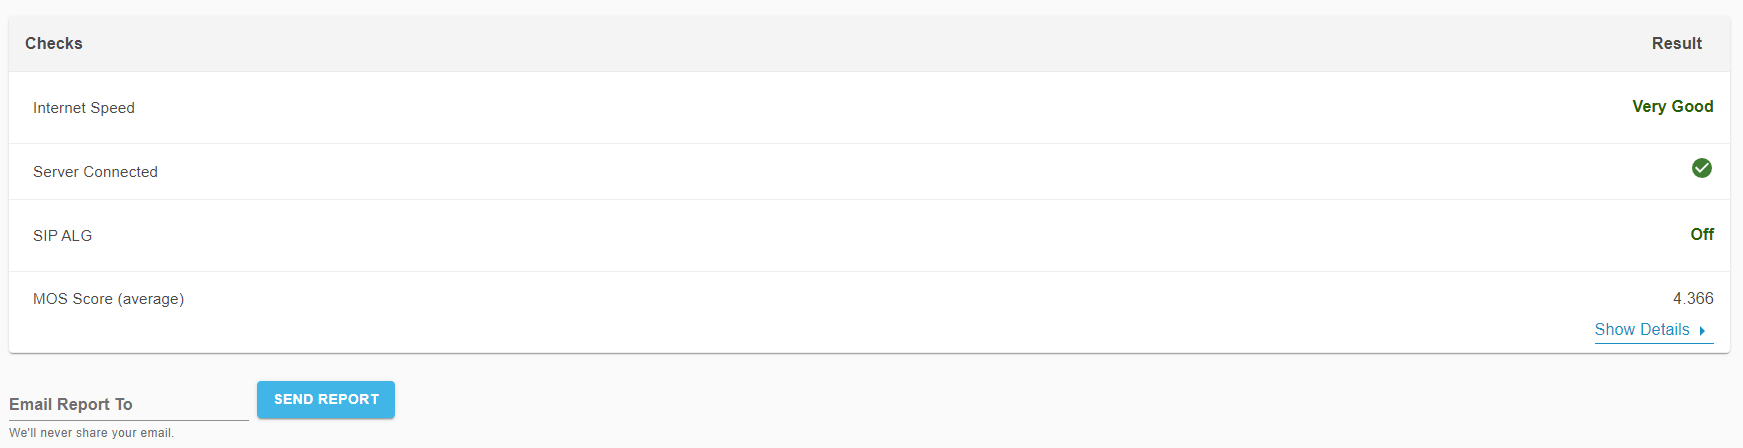
- To view more details about your MOS Score, click Show Details.
✔ The details shown for your MOS Score can be very useful for your IT team, MSP team, or Internet Service Provider (ISP) to use as they troubleshoot issues on your internet network.

- If needed, use the Email Report To box to type in an email address, and click the SEND REPORT button to share copies of the report with other associates.

App Updates
Periodically, there may be updates available for the app. This will usually happen semi-automatically when the app is opened.
Whenever an update is available, a pop-up may appear prompting the user to click ‘update’ to apply the update.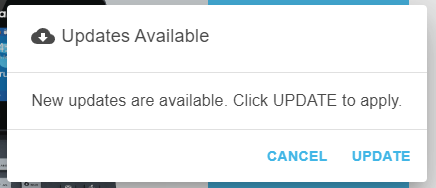
Alternatively, you can force a check for updates by clicking on the refresh icon in the top left of the app. Or Press Ctrl+F5 to refresh the app while it is in the foreground.