Note: The Tiered Round-Robin function was introduced in Primecall V43.
Overview
Round-Robin is a type of call queue that evenly distributes incoming calls one at a time depending on which user has not had a call in the longest amount of time.
- This is commonly used in call environments like a sales office where each sales agent needs to be given an equal call volume to fairly distribute potential sales.
A Tiered Round-Robin queue follows the same principle with the exception that agents are placed into tiered groups. When a tier has been attempted, then the call will ring into agents in the next tier, and so on. If the queue reaches the last tier and an agent is still not available, then the caller will be sent to the extension or number that is set in the In-Queue Options of the call queue's settings.
NOTE: A Tiered Round-Robin is not a "ring all" call queue. Agents will be rung one at a time for the configured timeout.
Example Scenario
For instance, a call enters a Tiered Round-Robin call queue that has been configured with a 10 second timeout. The longest idle agent in Tier 1 will be rung for ten seconds. If there is no answer, then the next longest idle agent will be rung for ten seconds, and so on until all agents have been rung in Tier 1. After Tier 1 has been attempted, then Tier 2 agents will be rung in a similar fashion.
✔ Implementing this type of call queue can help increase the number of potentially available agents and the likelihood of calls being answered.
Create a Tiered Round-Robin
To create a Tiered Round-Robin queue…
- Navigate to the Call Queues section.

- Take note of the next extension number available and then select Add Call Queue.

✔ Doing so will pop up a modal for configuring a new queue:
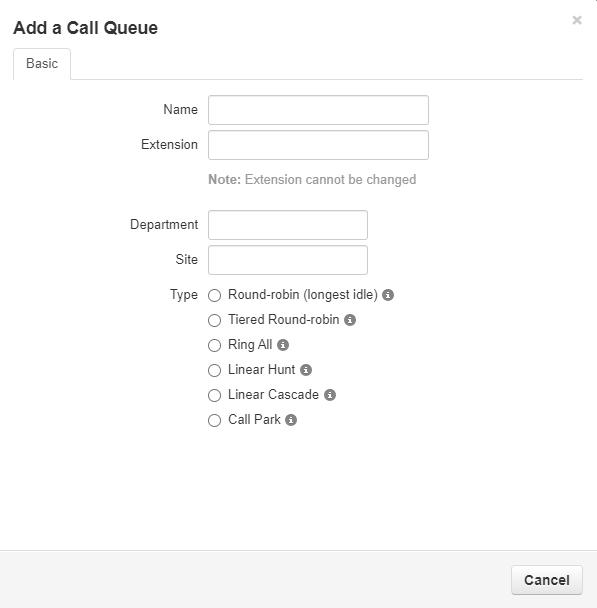
- In the Basic tab of the menu, fill in the fields to create and customize a Ring All queue.
- Use the Name box to type in a name for the queue.
- In the Extension box, type in the next available extension number.
DANGER: Always use an extension number that is NOT in use.
Quick Tip: Using an extension number in the 8000s is recommended for call queues.
- In the Type list, select Tiered Round-robin.
✔ Once you select the Queue type, new information and tabs will become available to allow further customization of the queue.
- In the new Pre-Queue Options tab, the main setting adjusted is the Queue Audio.
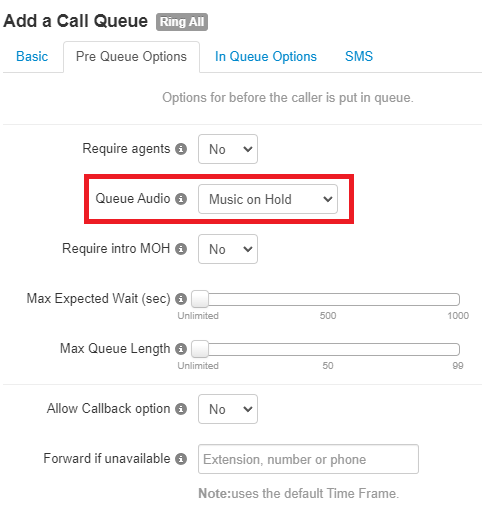
Quick Tip: By default, the queue will play the audio stored in the Music on Hold section.
To have the phone play ringing for callers in the queue, use the Queue Audio drop-down menu to select Ringback.

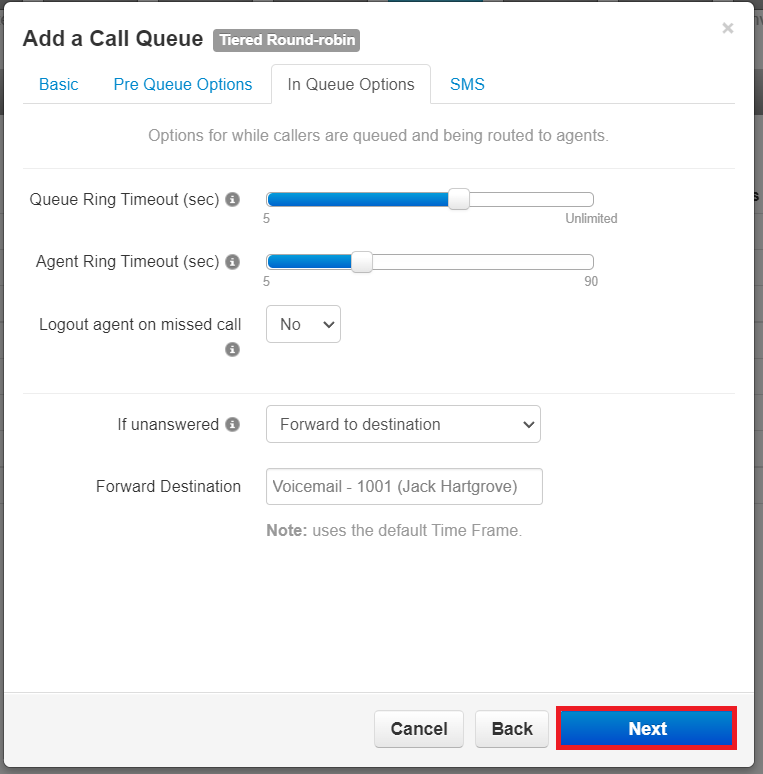
- In the In-Queue Options tab, use the Queue Ring Timeout slider to adjust the total amount of time the queue will attempt to ring all agents before following an exit option.

- Use the Agent Ring Timeout slider to set the amount of the time the queue will ring an agent before moving to the next agent in a tier.
- This value should mathematically make sense with the total set in the Queue Ring Timeout.
For example…
If there are 3 tiers that should ring two agents for 10 seconds each (20 total seconds), the queue should ring for a total of 60 seconds.
- This value should mathematically make sense with the total set in the Queue Ring Timeout.
- To set an exit option for calls that go unanswered, use the If unanswered drop-down to select Forward to destination.
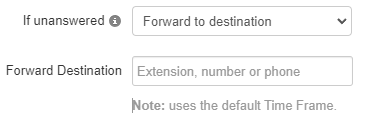
✔ Using the Forward to destination option, users can route unanswered calls to a call queue, auto attendant, user, or a 10-digit phone number.
- Once the Tiered Round-Robin queue has been configured, click Next and then Add.
Add Agents to Tiers
To create the tiers for the new Tiered Round-Robin queue, Agents will need to be added to the queue and designated a position in a tier.
To do so…
- Click the Edit Agents icon across from the new Tiered Round-Robin call queue.

- Click the Add Agent button.

✔ Doing so will pull up several settings you can adjust while adding a new agent.
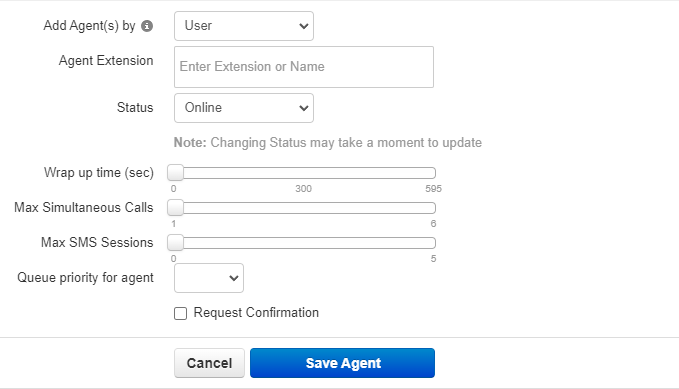
- Use the Agent Extension box to type in the extension numbers of users that will be in a tier together.

- Use the sliders to adjust certain settings for these agents.

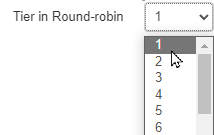
- Use the Tier in Round-robin drop-down to select which tier the agent(s) will be in.
- If needed, adjust the rest of the settings.

- Once the agent has been configured, click the Save Agent button.

- Repeat the process for any additional, new agents for the queue.
- Click the Done button once all agents have been added.
