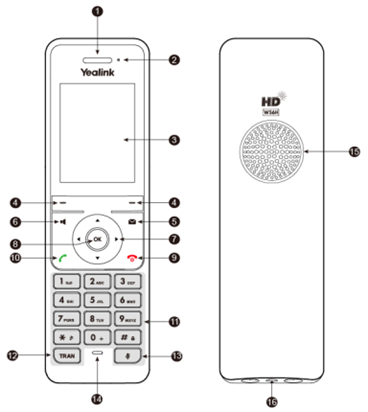
Handset Components
| Button Name | Function | |
|---|---|---|
| 1 | Receiver | Receives audio in receiver mode. |
| 2 | Power Indicator LED | Indicates call status, message status and charging status. |
| 3 | LCD Screen | Shows information. |
| 4 | Soft Keys | Depending on the status of the phone, the functions for the soft keys will change. |
| 5 | Message Key  | Accesses the voice mail |
| 6 | Speakerphone Key  | Switches among the receiver, headset and handsfree modes. Answers an incoming call. Places a call in handsfree mode. |
| 7 | Navigation Keys | Scroll through information or options on the screen |
| 8 | OK Key  | Confirms actions or enters the main menu. |
| 9 | Power/ Hang Up Key  | Press briefly to return to the previous screen. Long press to return to the idle screen. Press to turn the handset on. Long press on the idle screen to turn the handset off. Cancels actions or ends a call. Rejects an incoming call. |
| 10 | Dial Key  | Answers an incoming call. Enters the redial calls list. Places a call in receiver or headset mode. |
| 11 | Keypad | Provides digits, letters, and special characters. |
| 12 | Transfer (TRAN) Key | Transfers a call to another party. |
| 13 | Mute Key  | Toggles mute feature on or off. |
| 14 | Microphone | Picks up audio. |
| 15 | Speaker | Outputs audio in handsfree mode. |
| 16 | 5mm Earphone Jack | Used to connect a standard 3.5mm headset. |
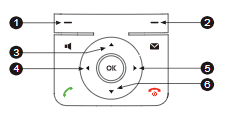
Shortcut Keys
| Shortcut | Feature | |
|---|---|---|
| 1 | Left Soft Key | History |
| 2 | Right Soft Key | Line Status |
| 3 | Up Navigation Key  | Intercom |
| 4 | Left Navigation Key  | Volume Down - |
| 5 | Right Navigation Key  | Volume Up + |
| 6 | Down Navigation Key  | Directory |
Power LED Indicator
| LED Status | Description |
|---|---|
| Solid red | The handset is charging. |
| Fast flashing red (300ms) | The handset is ringing. |
| Slowly flashing red (1s) | The handset receives a voice mail or has a missed call. |
| Off | The handset is powered off. The handset is idle. The handset is fully charged. |
Basic Features
Voicemail
Voicemail feature allows you to leave voicemails for someone or listen to your voicemail messages on your phones.
Set a Voicemail Key for a Specific Line
You can set digit key 1 as a voicemail key for a specific line. When the handset is idle, you can long press this key, and quickly access the voicemails without scrolling through the menu.
If there is only one account on the phone, this feature is set up by default.
- Press the OK button to access the Menu.
- Navigate to Voice Mail → Set Key 1.
- Use the navigational buttons to hover over the desired line.
- Press Select.
Listen to Voicemails
- Press the OK button to access the Menu.
- Navigate to Voicemail → Play Message
Quick Tip: Alternatively, you can press the Message button.
- Use the navigational buttons to hover over the desired line.
- Press Select.
- Enter your voicemail PIN when prompted.
Note: If you have not changed your voicemail PIN, the default should be 1478
- Follow the menu prompts to listen to and manage your voicemails.
Do Not Disturb (DND)
DND enables your phone to reject all incoming calls automatically when you do not want to be interrupted. You can enable DND for specific lines.
- Press the OK button to access the Menu.
- Navigate to Call Features → Do Not Disturb.
✔ The phone screen will display the incoming lines currently assigned to the handset. The default incoming line is highlighted and followed by a left arrow.
- Select the desired line, and then press OK.
- Select Enabled from the Status field.
- Press Save
✔ The DND icon in the status bar will appear to indicate that DND mode is activated.
You can press the Line soft key when the handset is idle to check the line status.
The Keypad Lock
Lock a Handset's Keypad
Long press the # key when the handset is idle until the phone prompts you the handset is locked.
✔ The lock icon will appear on the status bar.
Unlock a Handset's Keypad
Long press the # key when the locked handset is idle until the phone prompts you the handset is unlocked.
✔ The lock icon will disappear from the status bar.
Customize Your Handset
There are many Basic Settings that can be adjusted on the handset to match your preferences.
The Backlight and Keypad Light
The handset backlight in charger or out of charger can be configured independently.
Set the Backlight's Timeout
When in charger/out of charger is enabled, the backlight will be turned off after the handset is idle for about 30 minutes when the handset is or is not in the charging cradle.
When an incoming call arrives, a key is pressed, or the handset's status changes, the backlight is automatically turned on.
- Press the OK button to access the Menu.
- Navigate to Settings → Display → Display Backlight.
- Select the desired timeout for the In Charger and Out of Charger fields.
- Press the Save softkey.
Adjust the Keypad Light
You can enable the keypad light to illuminate the keypad keys when any key is pressed.
- Press the OK button to access the Menu.
- Navigate to Settings → Display → Keypad LED.
- Press the Change softkey.
Change the Language
The handset supports 10 languages: English, French, German, Italian, Polish, Portuguese, Spanish, Turkish, Swedish, and Russian.
The default handset language is English.
- Press the OK button to access the Menu.
- Navigate to Settings → Language.
- Use the navigational buttons to hover over the desired language.
- Press the Select softkey.
✔ The phone screen will pull up a prompt asking if you would like to
- Press the Yes softkey.
Placing and Answering Calls
Place A Call
Do one of the following:
- Enter the desired number using the keypad.
- Press the Speakerphone key to enter the pre-dialing screen.
- Enter the desired number using the keypad.
- Press OK, the Speakerphone key, or the Green Send Key to dial out.
Answer a Call
There are several ways you can answer calls on your cordless handset. To do so, either…
- Press the Send button.
- Press the Answer softkey.
In-Call Features
Utilize the Hold Feature
You can place an active call on hold and resume the call when you are ready. When you place a call on hold, Primecall may play music on hold to the other party while they wait for an agent.
Place an Active Call on Hold
- While on an active call, press the Options softkey.
- Using the navigational buttons, select Hold.
- Press the OK button.
Resume a Call That is on Hold
If you only have one call on hold and no other active calls you can resume that call by pressing the softkey under the word Resume
- Use the navigational buttons to select a call on hold from the list of on hold calls on your screen.
- Press the Resume softkey.
WARNING: If you have a call on hold and are currently on another active call you must place the active call on hold, transfer it, or end it before you can resume a call on hold.
Swap Between Held Calls
Do one of the following to swap the active and held calls:
- If the call is active, press the Swap soft key.
- Press the up or down navigation button.
Transfer an Active Call
This allows the user to transfer an active call to another party's extension or off-net phone number.
Perform a Blind Transfer
A blind transfer allows any user to transfer an active call to another destination as quickly as possible.
- While on an active call, press the Options softkey and then press Transfer (or TRAN).
- Dial the extension number or phone number you want to transfer the call to.
Quick Tip: To send a call directly to voicemail, dial 03 before the user’s extension
- Press TRAN or Transfer to complete the transfer.
Perform a Supervised/Attended Transfer
A supervised transfer allows any user to transfer an active call to another destination after speaking with the 3rd party first.
- While on an active call, press the Options softkey and then press Transfer (or TRAN).
- Dial the extension number or phone number you want to transfer the call to.
- Press the green Send button.
Quick Tip: Alternatively, you can wait 3 seconds and the number will automatically dial out.
- When the other party answers their phone, you can speak with them before transferring.
✔ Attended transfers are often used to share notes about a call.
This is a great way to ensure that the other party isn't surprised or out of the loop about a transferred call. - Press TRAN or Transfer to complete the transfer.
Call Park and Call Retrieve
You can use this feature to park a call, and then retrieve the call either from your phone or another phone. After you park a call, the call is placed on hold, you can continue the conversation after retrieving it.
Park a Call
- While on an active call, press *** on the keypad.
WARNING: Do not press the Send (#) button.
- You will hear a message played indicating the parking spot number where the call can be retrieved.
✔ The phone will read off a message that says where the call is parked:
“The call is parked at 7-0-1”. - The caller is now on hold until a phone retrieves the call.
Retrieve a Parked Call
- Dial the parking spot number where the call is parked (ex. 701)
- Press the Send (#) button.
✔ The phone will pick up the call that was parked in that park queue.
Conference Calls
The Yealink phones support creating a conference with two other external parties or an external and an internal party.
- While on an active call, press the Options softkey.
- Press the Conf. softkey.
- Enter the extension number or phone number of the users to add to the three-way call.
✔ The first active call will be placed on hold.
- When the second party answers the call, press Conf. again to join all parties in the conference.
Device Reboots and Factory Resets
Restart the Base Station
Improper operation may cause malfunction. If a malfunction occurs, your system administrator may ask you to restart the base station to refresh the settings.
- Press the OK button to access the Menu.
- Navigate to Settings → System Settings → Base Restart.
- Enter the system PIN.
Note: The default PIN should be 0000.
- Press Done.
✔ After the above steps, the registration LED and network status LED will dim simultaneously. After a period of time, the LED indicators will glow green again when the base station restarts successfully.
Reset the Base Station
Generally, some common issues may occur while using the phone. Your system administrator may ask you to reset your phone to factory after you have tried all troubleshooting suggestions but still do not resolve the problem.
DANGER: Resetting the base station will delete all your personal settings and reset all settings to the factory defaults.
It is suggested to check with your system administrator to see if any of the personalized settings need to be kept before resetting your phone to factory.
- Press the OK button to access the Menu.
- Navigate to Settings → System Settings → Base Reset.
- Enter the system PIN.
Note: The default PIN should be 0000.
- Press Done.
- Select Reset to factory.
- Press OK.
✔ All individual settings of the base station will be reset to factory defaults.
The power and network status LEDs on the base station will slowly flash in sequence during the reset process. These LED indicators will glow green after startup.
Reset the Handset
You can reset individual settings that you have configured on the handset.
NOTE: Resetting the handset will not overwrite the settings of the directory, call history, voicemail, and the handset's registration. Other customized settings on the handset will be reset to factory after the handset is reset.
- Press the OK button to access the Menu.
- Navigate to Settings → System Settings → Handset Reset.
✔ The phone will pull up a prompt to confirm if the phone should be reset.
- Press the Yes softkey.
Register a Handset to a Base
- If a handset warns that it is “Unregistered!”, long press the button on the center of the base station until the registration LED flashes
- Press the
- Select Register Handset.
- Select the base station to register the handset to.
Quick Tip: Alternatively, you can press the Reg soft key on the handset.
- Use the dial pad to enter the base's PIN.
Note: The default PIN should be 0000.
✔ After the handset is registered successfully, the phone prompts “Handset Subscribed” and “Base NO. (The last 4 characters of the connected Base’s MAC address)”.
After the handset connects and makes any necessary config updates, an icon with the internal handset number and handset name will appear on the handset's screen.
Deregister a Handset from a Base Station
You may need to deregister your handset if you want to replace a base station.
- Press the OK button to access the Menu.
- Navigate to Settings → Registration → Dereg. Handset.
- Enter the system PIN.
Note: The default PIN should be 0000.
- Press the Done softkey.
✔ The phone screen will display the names of the handsets that are registered to the same base station. The name of the handset itself is highlighted and followed by a left arrow.
- Use the directional buttons to hover over the name of the handset.
- Press the OK button.
✔ The phone will pull up a prompt to confirm if the handset should be deregistered and disconnected.
- Press the Yes softkey.