There are 3 potential ways a Primecall user would be able to fax.
- Portal Faxing - Inbound and Outbound faxing that is done through the Primecall Web Portal
- Fax to Email (email to fax)
- Fax Machine - this method utilizes an ATA adapter to allow a physical fax machine to fax through the internet.
This is the User Guide for faxing via the portal using PrimecallFAX.
Prerequisite
PrimecallFAX must be set up on a user's domain and directed at a user's extension number. The set up process must be completed by PrimecallVoIP. Additional Charges May Apply for setting up PrimecallFax services.
Sending A Fax
PrimecallFAXing is done through the Primecall Web Portal. (www.primecall.com )
The user will need to log in to the Primecall web portal in order to get to the Faxing section of the portal.
Note
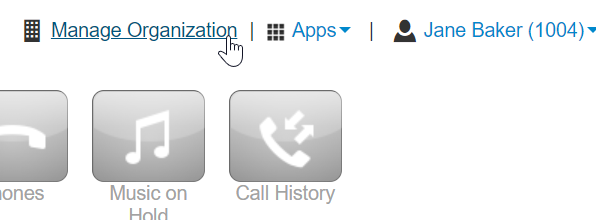
If you are not signed in as a Basic User user scope, you will need to navigate to your personal account view by clicking on your name in the top right-hand corner of the screen and clicking on My Account.
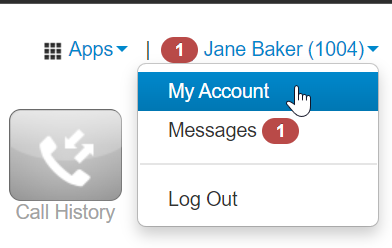
Then, you will be on your personal account view. To get back to your account management view, click on Manage Organization.
Navigate to the Fax section of the user portal by clicking on the Fax Icon
To send a a fax, click on the Send Fax Button
The Send Fax modal will look similar to the below image.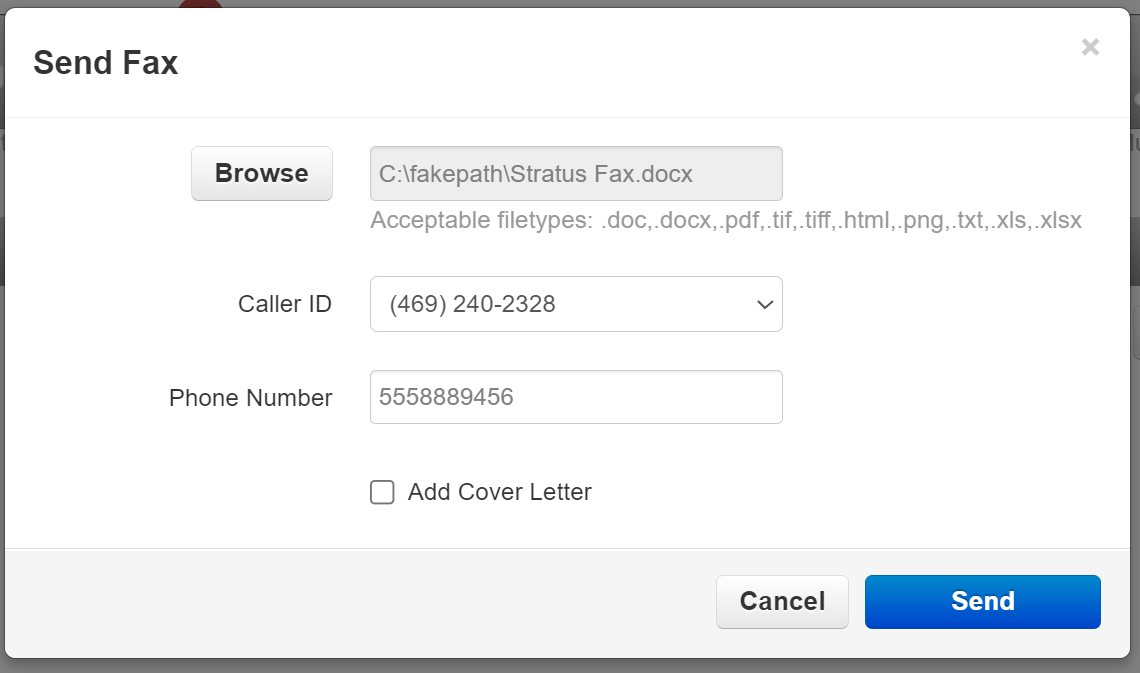
Browse is where to select the file that should be sent as a fax (such as a PDF or Word document).
Caller ID is the number where the fax should originate from. This list is derived from the assigned fax number list in the Inventory. If you
The Phone Number is the number where the fax should be Sent To.
Check the box for cover letter if there should be a page introducing the fax when it arrives to the recipient. This becomes the first page in the delivered fax, and is often used to indicate the name of the company who is sending the fax, or a brief note describing the document. If you select Add Cover Letter, you will be able to fill out a form with this information
If cover letter is checked, then text fields will become available to specify subject, names, and relevant notes. 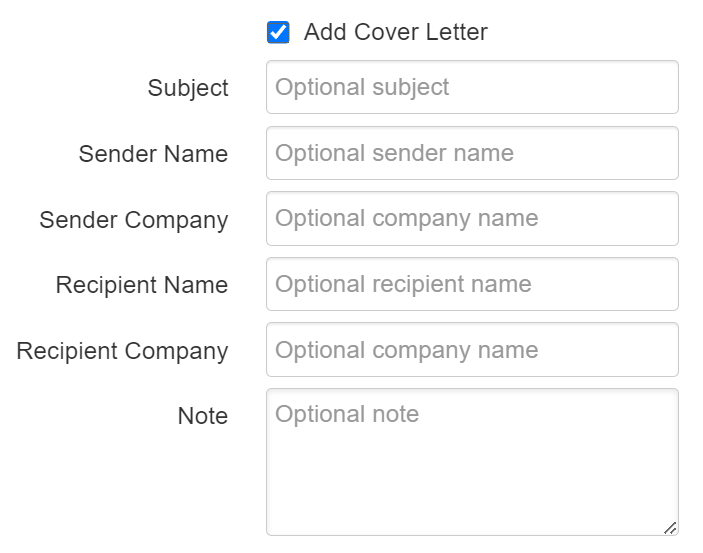
Click Send to finish.
You will see a message saying that the fax was uploaded for sending successfully. If you do not, please check your attachment and try again.

Message Folders
PrimecallFAX has two folders for managing faxes. Inbox and Sent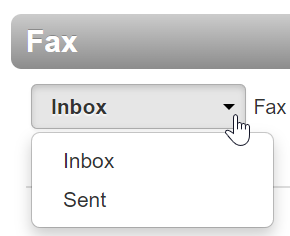
Note
PrimecallFAX storage limit is linked to the user's voicemailbox limit. This is usually set to 10MB by default.
While 10MB should be more than enough for any basic user's faxing needs, we do recommend staying on top of managing your faxes in inbox and sent folders.
Unneeded faxes can be deleted using the Red X button to free up storage space. This is good to do once you have downloaded the fax to your personal device.
Action Icons
Next to each sent message there are action icons.
Download - click to download this fax as a PDF.
View - hover over this icon to get a quick view snap shot of the fax
Delete - click this to remove the fax from PrimecallFAX. We recommend to do this after you have first downloaded the fax to your personal device. 
Inbox
The Inbox folder is where you will be able to view any non-deleted inbound faxes to your user.
Sent
The Sent folder is where you will be able to view any non-deleted outbound faxes that have been sent via the Primecall Portal. This will not show faxes sent through other means, such as a Fax Machine using an ATA or through Fax To Email.
Status Indicators
There may be status indicators next to fax messages to indicator their current progress. Refresh Primecall Portal to get the most current information.
Sending - While a faxing is in the process of sending, you may see a Sending badge next to the To Destination Number. This means the fax is still transmitting. Please wait for the fax to complete it's transmission. Depending on the size of the uploaded file, this could take several minutes. 
Error - If an error has occurred while sending the fax, an Error badge will appear next to the To Destination Number. This means there was an issue sending that particular fax. You can hover over it for more information. You will need to attempt to send that fax again using the Send Fax button. 